In this post, we feature a comprehensive Apache name-based Virtual Host Configuration Example. This article is part of our Academy Course titled Apache HTTP Server Tutorial.
In this course, we provide a compilation of Apache HTTP Server tutorials that will help you get started with this web server. We cover a wide range of topics, from installing the server and performing a basic configuration, to configuring Virtual Hosts and SSL support. With our straightforward tutorials, you will be able to get your own projects up and running in minimum time. Check it out here!
In our previous tutorial we discussed how to configure Apache as a standalone web server (hosting a single site) and how to configure it. In addition, we outlined the most frequent directives and explained the concept of context, which indicates the place where a directive is valid. If you have not read the Apache configuration tutorial yet, you are highly encouraged to do so before proceeding.
In this guide we will show you how to use Apache to run multiple sites using a single machine. This practice is known as name-based virtual hosting, and is key to our understanding of how a web server works. Using one machine to run several domains clearly has its advantages (low maintenance costs, for example) and a few disadvantages as well (without a bandwidth balancer in place, a single site can end up consuming the entire bandwidth allocated for the server, thus impacting negatively the operation and performance of the rest).

1. Reviewing the Apache configuration file
As you will recall from the previous guide, the main configuration file for Apache (where system-wide settings are found) is located in /etc/httpd/conf/httpd.conf in CentOS or /etc/apache2/apache.conf in Ubuntu. Note how we now refer to such file as the “main configuration file” and not only as “the configuration file” because we will see in a moment how you will use other files to define the directives for each virtual host.
Near the bottom of the main configuration file you will see the following lines:
In CentOS:
# Load config files in the "/etc/httpd/conf.d" directory, if any.
IncludeOptional conf.d/*.conf
In Ubuntu:
# Include the virtual host configurations:
IncludeOptional sites-enabled/*.conf
As the comment indicates, and as the IncludeOptional directive suggests, Apache will look for .conf files in the /etc/httpd/conf.d (in CentOS) or /etc/apache2/sites-enabled (Ubuntu) which, if present, are used to indicate the various directives that define a virtual host.
2. Defining virtual hosts
To begin, we will need to either
a) use 2 dummy domains (such as www.example1.com and www.example2.com, as in this guide, or others of your choosing), or
b) use 2 “real” domains that you have registered. This last option also requires that you have set up DNS entries for those domains with your cloud hosting provider, but such procedure is out of the scope of this tutorial as it is specific for each provider.
Note that each virtual host will need a directory structure to store files and logs. In addition, the user Apache runs as (apache in CentOS or www-data in Ubuntu) needs to be able to read the web content. To do it, create the following directories and assign the indicated permissions:
mkdir -p /var/www/example1.com/public_html
mkdir -p /var/www/example2.com/public_html
chmod -R 0755 /var/www/
Let’s start by defining www.example1.com. To do it, insert the following block in /etc/httpd/conf.d/example1.com.conf (CentOS) or /etc/apache2/sites-available/example1.com.conf (Ubuntu):
<VirtualHost *:80>
DocumentRoot "/var/www/example1.com/public_html/"
ServerName www.example1.com
ServerAlias example1.com
ErrorLog /var/www/example1.com/error.log
LogLevel info
CustomLog /var/www/example1.com/access.log combined
</VirtualHost>
Then repeat for the other domain:
<VirtualHost *:80>
DocumentRoot "/var/www/example2.com/public_html/"
ServerName www.example2.com
ServerAlias example2.com
ErrorLog /var/www/example2.com/error.log
LogLevel info
CustomLog /var/www/example2.com/access.log combined
</VirtualHost>
In CentOS, creating those files and restarting Apache is enough to define your two virtual hosts. In Ubuntu, however, you will need to use the a2ensite utility to create a symbolic link inside /etc/apache2/sites-enabled that points to the configuration file in the sites-available directory, as shown in Fig. 1:
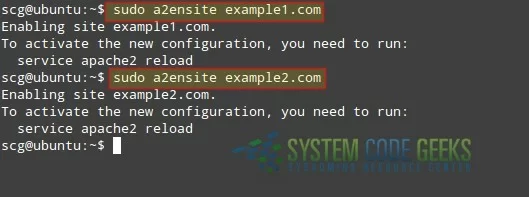
sudo a2ensite example1.com
sudo a2ensite example2.com
Then restart Apache:
In CentOS:
systemctl restart httpd
In Ubuntu:
service apache2 restart
Finally, let’s create a sample index.html inside /var/www/example1.com/public_html. By indicating the presence of the jQuery library as a resource in this simple page, we will be able to recognize success and failures in the logs later:
<!DOCTYPE html>
<html>
<head>
<meta charset="utf-8">
<title>Example1.com</title>
<script src="jquery-1.12.0.min.js"></script>
</head>
<body>
<h1>Welcome!</h1>
<h3>This is Example1.com</h3>
</body>
</html>
and another one inside /var/www/example2.com/public_html:
<!DOCTYPE html>
<html>
<head>
<meta charset="utf-8">
<title>Example2.com</title>
<script src="jquery-1.12.0.min.js"></script>
</head>
<body>
<h1>Welcome!</h1>
<h3>This is Example2.com</h3>
</body>
</html>
Since both www.example1.com and www.example2.com are dummy domains, we need to tell our client computer how to find them. The most basic name resolution method is using the /etc/hosts file in our computer to map the IP address of our web server to those domains.
Using the Ubuntu server’s address (192.168.0.30, change to fit your environment) as example, add the following lines to the /etc/hosts file in each client computer that you want to access the virtual hosts:
192.168.0.30 example1.com www.example1.com
192.168.0.30 example2.com www.example2.com
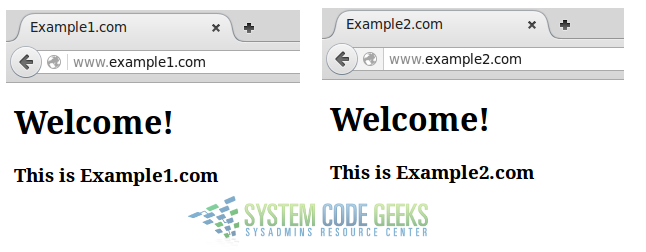
Save the changes and launch your web browser. When you enter www.example1.com and www.example2.com in the URL bar and press Enter, the result should be similar to that shown in Fig. 2:
3. Troubleshooting
When we defined the virtual hosts in each individual file, we declared an ErrorLog and a CustomLog to log errors and successes, respectively, while requesting a resource from the virtual hosts. If you experience an error while browsing, you can refer to each log to find out what is wrong. Also, the access log can help you detect which resources are being requested in each virtual host, the source IP address, the date and time, and more details.
Here are portions of error.log and access.log for example1.com:
Error log – the client tried to access 3 non-existent resources inside www.example1.com (/systemcodegeeks, /javacodegeeks, and /jquery-1.12.0.min.js) and received a 404 HTTP response (ERROR):
[Sat Feb 13 15:05:12.886906 2016] [core:info] [pid 1391:tid 139840660322048] [client 192.168.0.104:37553] AH00128: File does not exist: /var/www/example1.com/public_html/systemcodegeeks
[Sat Feb 13 15:06:15.123651 2016] [core:info] [pid 1391:tid 139840460887808] [client 192.168.0.104:37558] AH00128: File does not exist: /var/www/example1.com/public_html/javacodegeeks
[Sat Feb 13 15:06:46.845600 2016] [core:info] [pid 1391:tid 139840536422144] [client 192.168.0.104:37559] AH00128: File does not exist: /var/www/example1.com/public_html/jquery-1.12.0.min.js, referer: http://www.example1.com/
Access log – let’s see what happens when we download the jQuery library to the public_html directory and request the index.html file of www.example1.com:
192.168.0.104 - - [13/Feb/2016:15:11:16 -0300] "GET / HTTP/1.1" 200 494 "-" "Mozilla/5.0 (X11; Ubuntu; Linux x86_64; rv:42.0) Gecko/20100101 Firefox/42.0"
192.168.0.104 - - [13/Feb/2016:15:11:16 -0300] "GET /jquery-1.12.0.min.js HTTP/1.1" 200 34182 "http://www.example1.com/" "Mozilla/5.0 (X11; Ubuntu; Linux x86_64; rv:42.0) Gecko/20100101 Firefox/42.0"
As you can see above, this time the request received a 200 (OK) HTTP response in return. Make it a habit to inspect the logs for your virtual hosts often.
To temporarily disable a virtual host, follow this instruction depending on your distribution:
In CentOS, rename the configuration file (/etc/httpd/conf.d/example1.com.conf or /etc/httpd/conf.d/example2.com.conf) to something else not using the .conf extension. For example:
mv /etc/httpd/conf.d/example1.com.conf /etc/httpd/conf.d/example1.com
In Ubuntu, you can use the a2dissite utility as follows:
sudo a2dissite example1
In either case, this will prevent the IncludeOptional directive at the bottom of the main configuration file to load the definition of that specific virtual host.
4. Limiting bandwidth
As we explained in the introduction, you do not want a virtual host to consume all the bandwidth that is available in your server. To avoid this situation, we will make use of mod_bw, an Apache module that will allow us to limit the allocated bandwidth per virtual host.
Since mod_bw is not made available by default along with Apache, we will need to install it and make sure it is loaded before proceeding.
In CentOS 7, mod_bw is not available in an official repository. For that reason we will use an unofficial repo to install the package:
yum install http://repo.unmanarc.com/CentOS/7/RPMS/x86_64/mod_bw-0.92-2.el7.centos.x86_64.rpm
Once installed, we need to replace the path to the installed module in /etc/httpd/conf.d/mod_bw.conf:
sed -i 's@extramodules/mod_bw.so@modules/mod_bw.so@g' /etc/httpd/conf.d/mod_bw.conf
Then restart Apache.
In Ubuntu, the installation is more straightforward as mod_bw is provided by the libapache2-mod-bw package:
sudo apt-get install libapache2-mod-bw
Apache will then be restarted following the installation of libapache2-mod-bw.
As a totally silly test, let’s modify the total bandwidth allocated for www.example1.com to only 256 bytes for all clients (Bandwidth all 256 and MinBandwidth all -1) and limiting the number of connections from all sources to 5:
<VirtualHost *:80>
DocumentRoot "/var/www/example1.com/public_html/"
ServerName www.example1.com
ServerAlias example1.com
ErrorLog /var/www/example1.com/error.log
LogLevel info
CustomLog /var/www/example1.com/access.log combined
BandwidthModule On
ForceBandWidthModule On
Bandwidth all 256
MinBandwidth all -1
MaxConnection all 5
</VirtualHost>
If you now restart Apache and try to browse to www.example1.com, you will notice a significant delay to load the page, while www.example2.com can be loaded just as fast as before.
You will agree with us that the 256-byte bandwidth limit is an over-exaggeration, but it is helpful to view the results quickly. Feel free to check out the man page of mod_bw online for further examples on how to limit bandwidth per IP, network, file types, and other criteria. Then you will be able to come up with a bandwidth usage limit that applies accurately to your needs per virtual host.
Let’s take a look at another example. Perhaps you need to store big files (high resolution images, music, or videos, to name a few examples) in a separate directory of your virtual host for people to download – separate from the site pages. As we mentioned in the above paragraph, we can limit the bandwidth available by file type, and we can do so on a specific directory or on the virtual host definition.
That said, let’s create a directory named media inside the DocumentRoot of www.example1.com. Note that this will not interfere with the operation of the rest of the site:
mkdir /var/www/example1.com/public_html/media
and add a Directory block inside the virtual host definition (/etc/httpd/conf.d/example1.com.conf in CentOS or /etc/apache2/sites-available/example1.com.conf in Ubuntu):
<VirtualHost *:80>
DocumentRoot "/var/www/example1.com/public_html/"
ServerName www.example1.com
ServerAlias example1.com
ErrorLog /var/www/example1.com/error.log
LogLevel info
CustomLog /var/www/example1.com/access.log combined
BandwidthModule On
ForceBandWidthModule On
Bandwidth all 20480
MinBandwidth all -1
MaxConnection all 5
<Directory "/var/www/example1.com/public_html/media">
LargeFileLimit * 1024 10240
</Directory>
</VirtualHost>
The LargeFileLimit directive above will limit the bandwidth available for all files in the media directory, greater than or equal to 1 MB (1024 KB) to 10 KB/s.
Let’s see what happens when we attemp to download a .mp3 file from the media directory, as shown in Fig. 3:

You can place big files in the media directory and limit the bandwidth on that specific directory without interfering with the operation of the rest of the site.
Summary
In this article we have explained how to configure Apache as a web server for name-based virtual hosts. In order to prevent one (or more) virtual host(s) from consuming all, or a significant amount of the available bandwidth, we also discussed how to use mod_bw. On top of it, we showed you how to check the individual logs of each virtual host to monitor their activity (requests and responses).
Feel free to experiment with the various Apache 2.4 directives and with mod_bw – you will be surprised at how much you can accomplish combining these two tools!