My relationship with the terminal—especially Windows PowerShell—has been a bit of a roller coaster.
I first discovered the terminal when I heard about Python and didn’t know anything about anything. Like the average person who uses computers for games and applications like Excel and PowerPoint, I went to the site, downloaded the installer, installed it, and clicked the icon. Imagine my horror when something like this popped up.

Where are the buttons? What’s with the old-timey font? What do I do with my mouse?
After beginning to program more and more, and learning about the terminal, I began to love Bash. Is it archaic? Yes. Are the commands nonintuitive and difficult to remember? Heck, yes. For some reason, this just made me love it more.
I had to work hard at it, and typing a bunch of what appears to be gobbledygook that had powerful results made me feel like a wizard. For instance, typing du -sk * | sort -n | tail (See? Gobbledygook!) is a really fast way to see the top 10 largest directories in your current directory.
As I learned more, I was able to customize how it looked and get fonts, colors, and prompts that made the terminal that much more inviting.
So I decided to take my newfound programming powers to work. Except that I work as a mechanical engineer, and typically that means Windows and SolidWorks. So I opened up the recommended terminal, PowerShell. And again, to my horror:
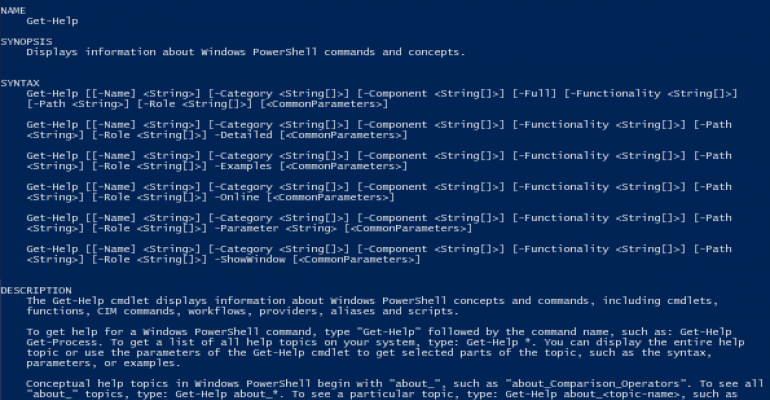
No problem, I thought. I’ll just go to the Preferences screen.
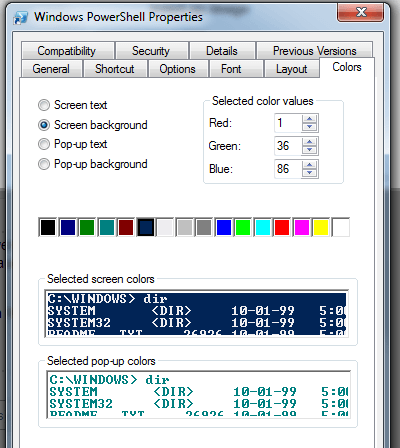
Oh, no. We’re not in Kansas anymore. Not exactly what I was used to. So I went into PowerShell and tried to do some simple things. Some things worked fine! ls, cd, and mkdir all worked like I was used to. But I couldn’t figure out why setting the $PATH was so hard to do. And what was with all of these backslashes? How come I couldn’t sudo?
More and more little irritations that kept reminding me that I wasn’t using Bash kept cropping up. I gave up and installed Cygwin, which allowed me to have a Bash experience on my Windows 7 computer. Except not quite. Everything I tried to do to get back to Bash on my Windows machine was just … not quite right.
Finally, I tried another approach and began to work on learning PowerShell the right way, from the beginning, as another language. As I learned, I found myself buying into the whole PowerShell philosophy and noticing the things that were a little bit nicer than when I was using Bash. Keep in mind, like everything, PowerShell is just another tool in the toolbox, and whether or not it’s the best tool really depends on the situation.
I’m not going to give you a complete lesson on the basics of the PowerShell language. I’m also not going to spend a lot of time telling you how to install PowerShell, either. This set of docs is fairly comprehensive, and it’s also a good cheat sheet for reference later.
My goal here is to show you how things translate from other shells and get you started on your own PowerShell journey, so I’ll assume that you have at least a little bit of experience with a shell language like Bash.
Getting Started with PowerShell
There are mental shifts away from how Bash-like shells do things that you need to make when you’’re starting to learn PowerShell. If you can get past your initial gut reaction of disgust when you see these differences, you might start to see that they actually make you more productive.
Everything Is an Object
This is probably the biggest difference that you have to get through your head. In Unix shells, everything is plain text. This makes things nice because you can expect text input into all of your scripts, and you can know that if you output text, everything will probably be OK.
However, the downside is that this makes inspecting specific data a nightmare of text parsing, and it makes working with anything other than text (floating point numbers, anyone?) a real pain.
In PowerShell, which is actually built on top of .NET, everything is an object. This will feel very comforting if you’re coming from Python, Ruby, JavaScript, or a similar language background. Let’s see some examples and get our hands dirty. Open up your PowerShell interpreter.
Side note: I put a PowerShell prompt (PS> ) in front of each command so you can tell what is output. Every line that starts with “PS>” is something for you to type. Every line without it is output.
PS> Get-Process
You should see a pretty long string of text. We don’t have to stand for that! We’re terminal folk! Try this:
PS> Get-Process | Sort-Object CPU -descending | Select-Object -first 10
Now you should see a shorter list, reverse sorted by CPU time. If you’re already getting itchy because all of these commands and options are so long, I address that in a couple sections. Stay with me.
The important thing to pay attention to here is the headers at the top of each column. Each row of this table is actually a System.Diagnostics.Process object, not just a row of a table. Don’t believe me? Just check!
PS> (Get-Process)[0] | Get-TypeData
See there? The Get-Process command returned a list of Process objects, and we were able to select the first one through indexing (without splitting the output by \n!) and shuffle that through the Get-TypeData command. These items being objects gives us some power. What if we only wanted their ProcessName?
PS> Get-Process | Sort-Object CPU -descending | Select-Object ProcessName -first 10
See how easy it was to access that? We didn’t have to cut the fields delimited by tabs or colons and count which field we wanted (1 … 2 … 3 … 4 … 5!). We just told it that we wanted the ProcessName attribute! No more parsing, splitting, joining, formatting output, etc.
Objects Have Types
Another side effect of being on top of .NET and having everything be an object is that everything must have a type. This may be confusing coming from a Bash shell that only has strings and strings that might get interpreted as commands. Here’s what it does for us.
PS> 2 + 2
4
Ah! Are you amazed? That would take way more work in Bash! And don’t even get me started on:
PS> 4.2 / 3
1.4
PowerShell usually does a pretty good job of trying to figure out the types that you mean so you can feel as dynamic as with other shells and scripting languages and not have to strictly have types on everything. But, if you really want to enforce a type, you can do so by prepending the object with its type in square brackets.
PS> "2" + 2
22  # A string
PS> [Int] "2" + 2
4   # An integer.  The conversion only applies to the "2"
Predictable Command Structure
This was one of the first things I noticed when I started using PowerShell. I was looking at example commands on Stack Overflow and getting so mad at how long the PowerShell commands were in comparison to the Bash commands. For example, to list the contents of your current directory in Bash:
$ ls -l
In PowerShell:
PS> Get-ChildItem
It’s so long! And capital letters? Come on. The good news is that you don’t have to type the whole thing out if you don’t want to. But, before I get to that, let me explain the rationale behind it.
Why So Long?
The creators of PowerShell wanted the commands to be extremely intuitive, such that you could almost guess the command that you needed. This would be basically impossible in Bash. There’s no way you could guess that cat is the common command to read a file into the terminal. Once you learn it, it makes sense that it’s short for “concatenate,” but it’s not intuitive by itself.
PowerShell commands were designed after a simple pattern: “Verb-Noun.” The creators of PowerShell tried to keep the number of verbs to a minimum. Common ones you’ll see are Get, New, Add, Clear, Export, Remove, Set, Update, and Write. The nouns are also usually pretty intuitive: Process, Item, Object, Date, Job, and Command are a few.
This consistent pattern allows someone to look at a script that has commands in it that they’’ve never used and still have some idea about what the script is doing.
The other benefit of keeping a consistent pattern is that PowerShell can detect the “verb” and “noun” sections of commands. For example, do you want to see all of the commands with the verb “New”?
PS> Get-Command -verb new
In fact, if you know what you want to do, but you can’t remember the command for it, Get-Command is one of a few commands that will be your friend. What if you wanted to see what kinds of things you could do to “Job” objects?
PS> Get-Command -noun Job
Yes, the commands are longer to type than their equivalent, typically terse Bash commands, but with this additional verbosity comes ease of use, less memorizing of commands, and helpful tooling to keep you productive.
Aliases Make Your Life Easy
Even though the commands are long and verbose, PowerShell knows that people using the terminal are lazy (in a good way!), and it doesn’t want to get in your way. It has a ton of built-in aliases to make your life easier and make you feel more comfortable, and it can actually do some aliasing on the fly.
Remember that command we ran earlier to see all of the files in our directory?
PS> Get-ChildItem

# You can also do:
PS> gci
PS> dir

# And, just to make you feel a little more at home...
PS> ls
Want to see all of the available aliases? By this point, you shouldn’t be surprised that the command is:
PS> Get-Alias
Using these aliases during shell sessions can keep you productive and save your fingers from wearing out without giving up the functionality and readability of the longer commands they stand for.
Best Practice for Scripting
Just a word on best practice: When you’re doing command-line work by yourself, feel free to use as many aliases as you want. Alias it up. Get your productivity on.
However, if you’re writing a script or sharing code with someone, it’’s probably best to type the whole command and whole flag-names out. Trust me, your future self and coworkers will thank you.
Some Useful Commands to Get Started
While the best way to learn PowerShell is to dive in and practice, I’m going to share some commands with you here that are really helpful when you’re a little stuck.
When You’’re Not Sure Which Command to Use
PS> Get-Command
This command will provide you with more information about available commands. You can zero in on what you want by specifying -verb or -noun parameters. In order to get more information about one or two particular commands, pipe the output into Format-List. This will give you the options, location, and some other useful features.
PS> Get-Command Get-Alias | Format-List
When You’re Not Sure What a Command Does
 PS> Get-Help command

# You can also get help by adding the ? parameter

PS> command -?
Get-Help is roughly the man of the PowerShell world. Are you starting to see the benefits of intuitive commands yet? Actually, Get-Help has quite a few useful flags, as well. It’s probably a good idea to take a look at them using the method we discussed above.
PS> Get-Command Get-Help | Format-List

# Or, if you're feeling cheeky:

PS> Get-Help Get-Help
When You’re Not Sure What Properties Your Object Has
PS> Get-Process | Get-Member

# Another similar command that also prints out the values is:

PS> (Get-Process)[0] | Format-List
If you know what data you want, but you just don’t know what it’s called, or if you aren’t even sure what data is available to you, these commands will help you “see” your objects a little better.
When You Want to Get a Portion of the Data
PS> Get-Process | Select-Object Id, ProcessName -last 20
Select-Object is your general purpose stuff-whittler. You can specify particular attributes you want, how many you want to see, and which ones.
When You Want to Filter Your Data
PS> Get-Process | Where-Object WS -gt 150MB
There are a few ways to use the Where-Object command, but this is the simplest one. In the example above, I selected only the processes whose working set (memory usage) was greater than 150MB. (Also, can we gush a little about how PowerShell can do KB/MB/GB math?)
Just Tell Me How to Do the Thing!
This last section will just be a few snippets for the impatient among you. If you’re just trying to get one darn thing done in PowerShell and you can’t make it work, these tips should hopefully help.
Basic Unix Commands Translated
# pwd
PS> Get-Location # or gl or pwd

# ls
PS> Get-ChildItem # or gci or dir or ls

# cd
PS> Set-Location # or sl or chdir or cd

# cp
PS> Copy-Item # or copy or cpi or cp

# mv
PS> Move-Item # or move or mi or mv

# cat
PS> Get-Content # or gc or type

# mkdir
PS> New-Item -ItemType Directory  # use ni for short

# touch
PS> New-Item -ItemType File  # use ni for short

# rm
PS> Remove-Item # or del or erase or ri

# rm -rf
PS> Remove-Item -Recurse -Force

# head or tail
PS> Select-Object -first  # or -last
# usage: Get-Process | Select-Object -first 10

# find
PS> Get-ChildItem -filter *.rb -recurse .
# but for a slightly easier to read version:
PS> Get-ChildItem -filter *.rb -recurse . | Select-Object FullName
Access the Path (and Other Environment Variables)
In PowerShell, a lot of things get treated like file locations—and the environment variables are no exception. These special groups of file-like variables are called PSDrives. In the same way you can ask the C: drive what file is at “\Users\ryan\Desktop” with a Get-ChildItem C:\Users\ryan\Desktop, you can do the same thing with env:, the environment PSDrive.
PS> Get-ChildItem env:

# And to get to a specific one:
PS> Get-Content env:PATH
One super neat thing about these PSDrives is that you can actually read a file location like it’s a variable. So you can also get to an environment variable this way:
PS> $env:PATH
This second way is probably the most popular way to get the PATH variable.
Customize My Profile
If you’re into command lines and you’re anything like me, you’re probably wondering how to customize themit. The answer lies in the $profile.
Finding the Profile
There are actually several profiles depending on which “Host” you’re using to interface with PowerShell. For instance, if you’re just using the regular PowerShell command line, the name of your profile file will be Microsoft.PowerShell_profile.ps1. However, if you are working in the PowerShell Integrated Scripting Environment (ISE), your profile will be Microsoft.PowerShellISE_profile.ps1. You can mostly ignore this, because if you ever want to know which profile to use, just ask:
PS> $profile
However, there are additional options. If you want to create a profile that will work for the ISE or the regular command line, you’ll want $profile.CurrentUserAllHosts. Or, if you want to configure a profile for all users on your computer, you’ll want $profile.AllUsersCurrentHost. There are a few options, and you can see them all with:
PS> $profile | Get-Member -type NoteProperty
Creating Customizations
Your profile works just like .bash_profile does in Bash. It’s just a script that gets run before you start working in PowerShell. You can add aliases (although see the note below), functions, and variables, and set custom settings. The simplest way to check if you already have a profile is
PS> Test-Path $profile
And to start creating your profile:
# Use whichever editor you love best
PS> code $profile
Here are a couple of useful settings you might like.
# Microsoft.PowerShell_profile.ps1

# You can customize the window itself by accessing $Host.UI.RawUI
$window = $Host.UI.RawUI
$window.WindowTitle = "Pa-pa-pa-pa-pa-pa-POWERSHELL"
$window.BackgroundColor = "Black"
$window.ForegroundColor = "Gray"

# You can define functions (remember to follow the Verb-Noun convention!)
function Count-History {
  (Get-History | Measure-Object).count
}

function beep {
  echo `a
}

function Edit-Profile {
  [CmdletBinding()]
  [Alias("ep")]
  PARAM()

  vim $profile
}

# You can set aliases
# NOTE: In PowerShell you can only alias simple commands.  Unlike Bash,
# you can't alias commands with arguments flags.  If you want to do that
# you should define a function instead.
Set-Alias touch New-Item  # old habits die hard, amirite?

# You can customize your prompt!
function prompt {
  # ... see the next section for more details on this.
}
Customize My Prompt
There are two ways to do this: the simple way and the complicated way.
The Simple Prompt
The simplest way to customize your prompt is by defining the prompt function, either manually or in your profile. For example:
function prompt {
 $histCount = (Get-History | Measure-Object).count
 return "POWERSHELL LEVEL OVER $histCount THOUSAND!!! >"
}
This is an amusing way to return the number of inputs that you’ve already typed inside your prompt. Whatever string you return is what gets set as the prompt.
The Complicated Prompt
Basically, you can do whatever you want in your prompt, as long as it returns a string at the end. For example, here’s a more complicated prompt:
function prompt {
  $loc = (Get-Location).Path.Replace("$HOME", "~")
  $gitBranch = git branch | Select-String "\*"
  if (!$gitBranch) {
    $gitBranch = ""
  } else {
    $gitBranch = $gitBranch.ToString().Replace("`* ", "")
  }
  $histCount = (Get-History | Measure-Object).count
  Write-Host -ForegroundColor yellow "`n $loc"
  Write-Host -NoNewLine "PS [$histCount] $gitBranch ->"
  return " "
}
You can see that I achieve a multi-line prompt by using Write-Host a number of times. Lastly, I simply return a space. My prompt ends up coming out like this:
~/Documents/blog
PS [102] master ->
Get It to Not Look Ugly
This is a tough one. Like I mentioned above, on Windows, PowerShell runs in a window with not very many customization options. Especially for someone who is used to being able to tweedle every knob of their text editor to their liking, it’s almost painful. There are two pretty good alternatives, though.
- Cmder: This one is built on top of ConEmu, which is a pretty popular terminal emulator for Windows. If you like Notepad++, I think you’ll really like this, because it feels similar.
- Hyper: This one’s nice for those of you that don’t have a vendetta against Electron applications and are more front-end-edly minded. The customization and settings are all done in JavaScript and CSS, which makes searching for help really nice. As might be expected from the JavaScript crowd, there are about a gazillion plug-ins, some of which are stable and quite good. There’s a lot of work being done on Hyper right now, so you may have some stability issues, but over the last few months, it’s really gotten quite a bit faster and hiccup-less.
Find More Resources
The best place to go is definitely the official docs. There’’s so much content there that they should have the answers you need. Since PowerShell is now open-source, you can also check out their GitHub repositories. There are some more great docs and getting started guides there as well.
Learning to Love PowerShell
The goal of this article is to show that just because PowerShell is different from what you are used to, it’s not necessarily bad.
If you take the time to really dig into the differences and learn the reasoning and design decisions behind them, you’ll start to see their strengths and value. You might actually miss dealing with typed objects in your command line when you go back to other shells.
Having to parse text streams might start to feel archaic. You might find yourself using longer, more consistent function names everywhere as you realize how nice it is to be able to read and understand your scripts six months after you write them.
Or, you might simply stop telling people how much you hate PowerShell whenever they mention it.
| Published on System Code Geeks with permission by Ryan Palo, partner at our SCG program. See the original article here: PowerShell Tutorial (Especially for People Who Hate PowerShell) Opinions expressed by System Code Geeks contributors are their own. |
