In this post, we feature a comprehensive Apache enable SSL / TLS Tutorial. This article is part of our Academy Course titled Apache HTTP Server Tutorial.
In this course, we provide a compilation of Apache HTTP Server tutorials that will help you get started with this web server. We cover a wide range of topics, from installing the server and performing a basic configuration, to configuring Virtual Hosts and SSL support. With our straightforward tutorials, you will be able to get your own projects up and running in minimum time. Check it out here!
In the previous articles of this series, we discussed how to install Apache, configure virtual hosts, rewrite and redirect URLs, and add basic authentication to access resources, among other things.
Although all those things are necessary in order to have a functional web server, any serious discussion about Apache must take security into account.
In other words, you need to ensure that sensitive and other private data that is sent from a client to your web server is protected along its way.

1. Introducing SSL and TLS
Originally designed by Netscape to secure transactions between web servers and browsers, the Secure Sockets Layer (best known as SSL) protocol served well its purpose for a long time. This was the case until critical vulnerabilities (such as Heartbleed and Poodle) were found in some of its most-used implementations. This eventually led to the recommendation of avoiding SSL and using the Transport Layer Security, or TLS for short.
When you request a page over HTTPS (https://www.facebook.com/ for example), the server responds with a valid certificate that has been signed by a common trusted party, along with its public key. The client then returns an encrypted key (signed with the server’s public key), which is then decrypted using the server’s private key.
From this point on, a secure session is initiated between server and client, and both use the session key to encrypt and decrypt exchanged data. In more technical terms, asymmetric cryptography (public / private key pair) is used while the session key is being exchanged, and then symmetric encryption (shared key) is utilized while the client and the server communicate with each other.
2. Apache and TLS
In this guide we will again use example2.com, one of the virtual hosts that we previously set up. To begin, we need to make sure that the mod_ssl package is installed if we are using CentOS:
yum install mod_ssl
or that the ssl module is loaded in Ubuntu:
sudo service apache2 restart
To illustrate, we will use a self-signed certificate, which is easy to create and use.
Let’s begin by creating a special directory to store the certificate and the key.
In CentOS:
mkdir /etc/httpd/certs
In Ubuntu:
sudo mkdir /etc/apache2/certs
Important: The following example is based in Ubuntu, so if you are using CentOS make sure you change the path to the certs directory. The rest of the set up is identical for both distributions.
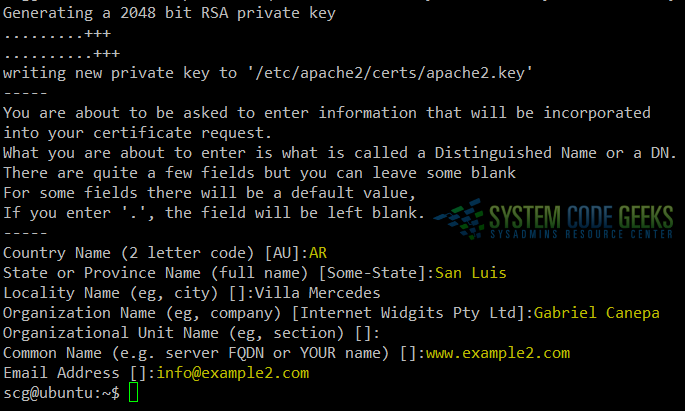
Now we can go ahead and create a certificate that will be valid for 365 days and a 2048-bit RSA key. As you can see in Fig. 1, you can fill the required fields with whatever information you want:
sudo openssl req -x509 -nodes -days 365 -newkey rsa:2048 -keyout /etc/apache2/certs/apache2.key -out /etc/apache2/certs/apache2.crt
You can find the explanation for the other options in the man page of openssl.
A quick inspection of /etc/apache2/certs will show the certificate and key files, as can be seen in Fig. 2:
cd /etc/apache2/certs
ls
file apache2.crt
file apache2.key

Now let’s go to the configuration file of example2.com, which up to this point should look as follows:
<VirtualHost *:80>
DocumentRoot "/var/www/example2.com/public_html/"
ServerName www.example2.com
ServerAlias example2.com
ErrorLog /var/www/example2.com/error.log
CustomLog /var/www/example2.com/access.log combined
</VirtualHost>
We need to tell Apache to use TLS for this particular virtual host. To do that, change the IP address and port where the virtual host is defined to 192.168.0.30 (the IP address of the Ubuntu server) and 443, respectively, and then add the following directives:
- SSLEngine on enables the usage of SSL and TLS for this virtual host.
- SSLCertificateFile /etc/apache2/certs/apache2.crt indicates the path to the certificate file.
- SSLCertificateKeyFile /etc/apache2/certs/apache2.key indicates the path to the key file.
- SSLProtocol All -SSLv3 tells Apache to use all protocols except SSL v3 (which means we are forcing Apache to use TLS only).
Now restart Apache.
The virtual host definition should now look as follows:
<VirtualHost 192.168.0.30:443>
DocumentRoot "/var/www/example2.com/public_html/"
ServerName www.example2.com
ServerAlias example2.com
SSLEngine on
SSLCertificateFile /etc/apache2/certs/apache2.crt
SSLCertificateKeyFile /etc/apache2/certs/apache2.key
SSLProtocol All -SSLv3
ErrorLog /var/www/example2.com/error.log
CustomLog /var/www/example2.com/access.log combined
</VirtualHost>
In CentOS 7, you will need to allow the https service through your firewall:
firewall-cmd --add-service=https
firewall-cmd --add-service=https --permanent
To test, you can now either open a browser and go to http://example2.com (you will be asked to confirm a security exception that indicates that the server is presenting a self-signed certificate) or add the following line to the /etc/hosts file:
192.168.0.30 example2 example2.com
and use the openssl tool as follows.
First, test a non-supported protocol (SSLv3 for example):
openssl s_client -connect example2.com:443 -ssl3
Then repeat the test using TLS:
openssl s_client -connect example2.com:443 -tls1
You should see a significant difference between the output of these two tests.
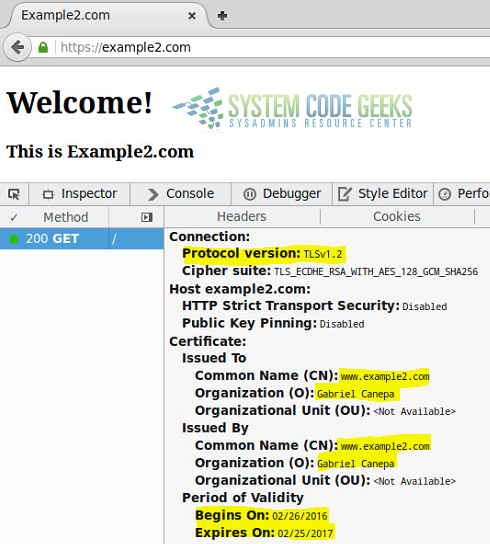
If you decided to use a browser to perform the test instead, you should see the certificate information after opening the developer tools (in Firefox, right click and choose Inspect element). Refer to Fig. 3 for details.
Congratulations! You have setup TLS with Apache.
3. Summary
In this guide we have outlined the necessary steps to add security to Apache. It is important to note that there is much more to security than what can be adequately covered in a single article. Thus, you are highly encouraged to become familiar with the mod_ssl documentation before taking your web server to a production stage.

Please provide same steps for windows