In this post, we feature a comprehensive Apache Configuration Tutorial. This article is part of our Academy Course titled Apache HTTP Server Tutorial.
In this Apache Configuration Tutorial course, we provide a compilation of Apache HTTP Server tutorials that will help you get started with this web server. We cover a wide range of topics, from installing the server and performing a basic configuration, to configuring Virtual Hosts and SSL support. With our straightforward tutorials, you will be able to get your own projects up and running in minimum time. Check it out here!
In the first article of this series we introduced you to Apache. If you took the time to read the introduction, you will have noticed that it is the number one server powering websites and Internet-facing computers – and there are plenty of good reasons for that.
In this guide we will discuss one of those reasons: its easiness of configuration and seamless integration with server-side scripting languages such as PHP in the context of a standalone web server. In this type of setup, Apache is used to serve a single domain or application, as opposed to running several sites off a single system (also known as virtual hosting, the topic of our next tutorial).

Note: The configuration syntax and directives of Apache have changed a bit from version 2.2 to 2.4. In addition, some well-known directives in version 2.2 have been deprecated in 2.4. If you followed the steps in the previous tutorial, you should have installed the latest version of the web server (2.4 at the time of this writing).
As you can see in Fig. 1, you can verify the Apache version in CentOS with
httpd -v
and in Ubuntu using
apache2 -v

1. Inspecting the Apache configuration file
As you can already tell based on the first article, the only difference between the Apache installations in CentOS and Ubuntu is the package name. Thus, it is to be expected that the main configuration file be named differently (httpd.conf in CentOS and apache2.conf in Ubuntu) and located in a different place in each distribution (/etc/httpd/conf/ and /etc/apache2/, respectively).
Regardless of the distribution, the main configuration file contains the configuration directives that give the server its instructions. You will use this file to configure system-wide settings for the web server, and additional files to set up virtual hosts (but again, we will expand more on that last topic in the next guide).
It is important to note that you should understand and familiarize yourself with the directives in the configuration file before making changes that can potentially affect the operation of the web server.
2. Apache modules
You can easily extend the web server’s operation by using independent, separate pieces of software called modules that provide specific functionality. Some modules come built-in with Apache, while others can be installed using your distribution’s package management system and enabled to integrate with the web server. Although we will discuss modules in later guides of this series, it is important to have this definition in mind before we dive into the configuration directives. You will see the reason in a minute.
3. Configuration directives
The following directives are listed in the main configuration file. All of them (and many, many more!) are explained thoroughly in the Apache 2.4 configuration docs online at http://httpd.apache.org/docs/current/.
If you want or need to read the Apache documentation offline, you can install the package httpd-manual in CentOS:
yum install httpd-manual
and apache2-doc in Ubuntu:
sudo apt-get install apache2-doc
You can then access the docs through a web browser (http://server/manual, where server must be replaced with the hostname or the IP address of the machine). This tool can come in handy if at a given time you cannot access the Internet to check the same resource online.
| Directive | Description | Example |
ServerRoot | The directory tree where the server’s configuration, error, and log files are kept. | Example |
Listen | The IP and port where Apache is bound. The default is listening on port 80 of all network interfaces, although it is more secure to specify a single IP address. | Listen 192.168.0.100:80 |
UserGroup | The name of the user/group to run the web server as. It is usually good practice to create a dedicated user and group for running Apache, as it is the case with most system services. You can also use the UID and the GID instead of the username and groupname, although it is not common to do so. | User apacheGroup apache |
ServerAdmin | The system administrator’s email address. Problems with the server will be sent to this address. | ServerAdmin root@localhost |
ServerName | The hostname and port that the server uses to identify itself. | ServerName www.example.com:80 |
DocumentRoot | The root directory where web pages and directories will be stored by default. Although all requests are taken made to this directory, you can create symbolic links to point to other locations. | DocumentRoot "/var/www/html" |
ErrorLog | The location of the error log file | ErrorLog "logs/error_log" |
LogLevel | Controls the verbosity of messages logged to ErrorLog. Possible values include:
When a particular level is specified, messages from higher levels (indicated by the numbered list above) will be logged as well. | LogLevel warn |
Directory | Used to enclose a group of directives that will apply only to the named directory and all its contents. | <Directory /> |
Files | Use to limit the scope of the enclosed directives by filename instead of by directory. Wildcards and other regular expressions are allowed. | <Files "restricted.html"> |
IfModule | Used to specify directives that are only applied if a specific module is present. | <IfModule mod_rewrite.c> |
Include | Includes other existing configuration files. If an absolute path is not used, it is relative to the ServerRoot directory. | Include conf/ssl.conf |
IncludeOptional | Similar to the Include directive, with the only difference is that it is ignored if there are no matches instead of causing an error (as it is the case with Include). | IncludeOptional sites-enabled/*.conf |
To view the values of a certain directive quickly from the command line instead of opening the configuration file, you can use grep as follows. Let’s say we want to find out what is the directory where Apache is expecting web pages and directories to be stored by default. Yes, you guessed it right – that information is provided by the value of the DocumentRoot directive:
grep -i documentroot /etc/httpd/conf/httpd.conf
or
grep -i documentroot /etc/apache2/apache2.conf
in CentOS and Ubuntu, respectively.
As we said before, these and all of the Apache directives are well documented in the project’s website and through the httpd-manual and apache2-doc packages. If you click on the Directives link at the top of the page (see Fig. 2):

you will be taken to the complete list of directives available in the current version of Apache. Choose any directive (we will use Include as example) and click on the link to be redirected to the detailed description. Pay attention to the highlighted area in Fig. 3 below:
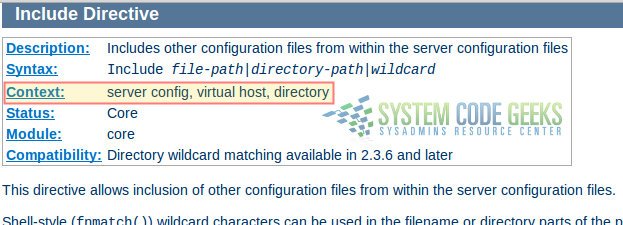
Each directive has a Context, or in other words, a place where it is valid and has meaning to the operation of the web server. In the case of Include, the description indicates that it can only be used in the system-wide server configuration, inside a virtual host definition, and within Directory tags. If you attempt to use it in a different place or inside the wrong set of tags (such as inside IfModule or Files), the web server will complain about it by refusing to restart correctly.
3. Basic authentication
Another set of directives, not outlined in the table above as they are not typically present out of the box in the configuration file, are those related with authentication and authorization. These settings allow to grant access to resources after a user has entered valid credentials.
Although there are other authentication mechanisms, we will only cover basic authentication in this guide (which consists of username and password) for brevity. Please be aware that this method sends the password from the server to the client unencrypted, so it should not be used with sensitive data (in a later tutorial we will introduce more secure options). You can refer to the Authentication and Authorization page of the documentation for further details.
To create a password for user jdoe (which does not necessarily have to exist as a system user) and store them securely in a new password file named passwds inside /etc/httpd/conf or /etc/apache2 (in CentOS and Ubuntu, respectively), follow these steps (don’t forget to use sudo to gain administrative privileges and to change the path to the file to /etc/apache2/passwds if you’re using Ubuntu):
Step 1 – Create the file with htpasswd, the tool that is used to manage basic authentication credentials. Use the -c option to indicate that we are creating a non-existent file:
htpasswd -c /etc/httpd/conf/passwds jdoe
Step 2 – Choose a new password for jdoe and enter it twice when you are prompted to do so.
Step 3 – Change ownership of the file to the user Apache is running as and set its permissions to 600:
In CentOS:
chown apache:apache /etc/httpd/conf/passwds
chmod 600 /etc/httpd/conf/passwds
In Ubuntu:
chown www-data:www-data /etc/apache2/passwds
chmod 600 /etc/apache2/passwds
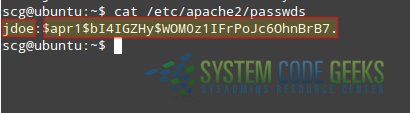
Let’s take a look at what the contents of the file looks like in Fig. 4 (username and encrypted password are separated by a colon):
In the following section you will see how to use these credentials to authenticate user jdoe and authorize him to access a resource served by Apache.
If you want to add other users to the same file, use htpasswd as explained earlier, only omitting the -c switch since the file now exists (no need to create a different one).
4. Directives in action
To put into practice all of what we have discussed so far, let us work with and modify the example given in the first article of this series. You will recall that we created a simple page named index.html inside /var/www/html. This directory, as you have learned in this guide, is of special importance as it is the default DocumentRoot.
Let’s picture the following scenario. We need to serve a file named restricted.html (also located inside /var/www/html) but only allow user jdoe to access such file after entering his password. Other files present inside DocumentRoot must be accessible to all users without authentication. Of course, this approach assumes this file exists in that directory already. If not, you can use the following example (open with your preferred text editor and save as restricted.html):
<!DOCTYPE html>
<html>
<head>
<meta charset=utf-8 />
<title>Restricted file</title>
</head>
<body>
<h1>Restricted file</h1>
<img src="http://files.softicons.com/download/folder-icons/dellios-system-icons-by-dellustrations/png/128/restricted.png" />
</body>
</html>
To accomplish our goal, let’s open the Apache configuration file and add the following Directory block:
<Directory /var/www/html>
<Files restricted.html>
AuthType Basic
AuthName "SystemCodeGeeks - Restricted file"
AuthBasicProvider file
AuthUserFile /etc/apache2/passwds
Require user jdoe
</Files>
</Directory>
Now restart Apache:
In CentOS:
systemctl restart httpd
In Ubuntu:
service apache2 restart
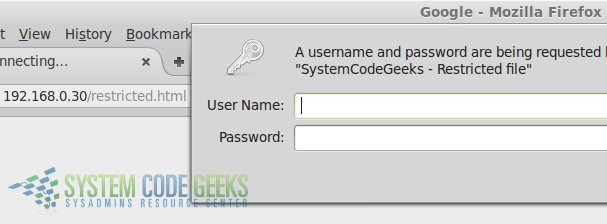
And browse to http://server/restricted.html (where, again, you will need to replace server with the hostname or IP address of your server) as shown in Fig. 5:
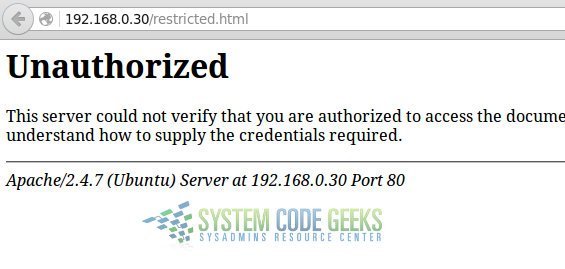
If you do not enter valid credentials, you will get the following error message:
Otherwise, you will be able to see the page:

Congratulations! You have configured your Apache web server to serve content based on user basic authentication.
5. Basic security considerations
It is advised, though not strictly required, to hide the Apache and operating system versions in error pages (as seen in Fig. 6). To do that, make sure the following directives have the indicated values in the configuration file. This will prevent (or at least, make it more difficult for) potential attackers from targeting known vulnerabilities either the web service or your server as a whole.
Add these lines at the end of the main configuration file:
ServerSignature Off
ServerTokens Prod
and you’re good to go.
6. Conclusion
In this guide we have explained how to set up Apache using directives in its configuration file. Don’t forget to check the official documentation for more details and options.
