In this article, I’ll review the necessary information for how to configure SNMP v1 options in a VMware vSphere ESXi host. If you also need to configure SNMP in a vCenter Server Appliance (vCSA), please check out my previous article: Configuring SNMP in a vCSA
If you’re already familiar with SNMP, and you’ve already enabled SSH on your ESXi host, skip ahead to Configuring ESXi SNMP Options.
1. SNMP Introduction
SNMP (Simple Network Management Protocol), as the name already indicates, is a network protocol (particularly an “application layer” protocol in the OSI networking model). In a nutshell, it’s used to “get” information from networked devices and/or to “send” information from one networked device to another.
“Why would I use this protocol?” you might ask. There are way too many examples to name, but I’ll list a couple of basic examples to help you become more familiar with why you might use SNMP.
Example 1: Where I work, I utilize a free piece of software called Spiceworks. One of the features of this software is that it can query various devices on our network (switches, firewall, printers, etc) in order to “get” information about them. Spiceworks utilizes SNMP to query all of the available information from each networked device that it communicates with.
Example 2: We also have a centralized syslog server (Kiwi ) that we “send” device information to; mostly event logs from our switches and firewalls.
Now that I’ve reviewed what SNMP is, and you’ve seen a couple of examples for how it can be used, let’s look at how to configure SNMP in a VMware ESXi host. The first thing you need to do is verify that you have appropriate access to the server (which will require enabling SSH).
2. Verify that SSH is enabled
There are three ways to accomplish this, and I’ll cover all three methods:
a. Direct console access (also known as DCUI)
b. vSphere Client (also known as the “vSphere thick client”)
c. vSphere Web Client (IF you have a vCenter server deployed)
2.1 Enable SSH via Direct Console UI
2.1.1. Main Console
To enable SSH via direct console access, you will need to either physically access the server, or use an out-of-band management solution (such as HP iLO, Dell iDRAC, KVM-Over-IP, etc). Once you have direct console access, the first thing you need to do is press F2 (“Customize System/View Logs”) at the main console window. Refer to Figure 1a below:
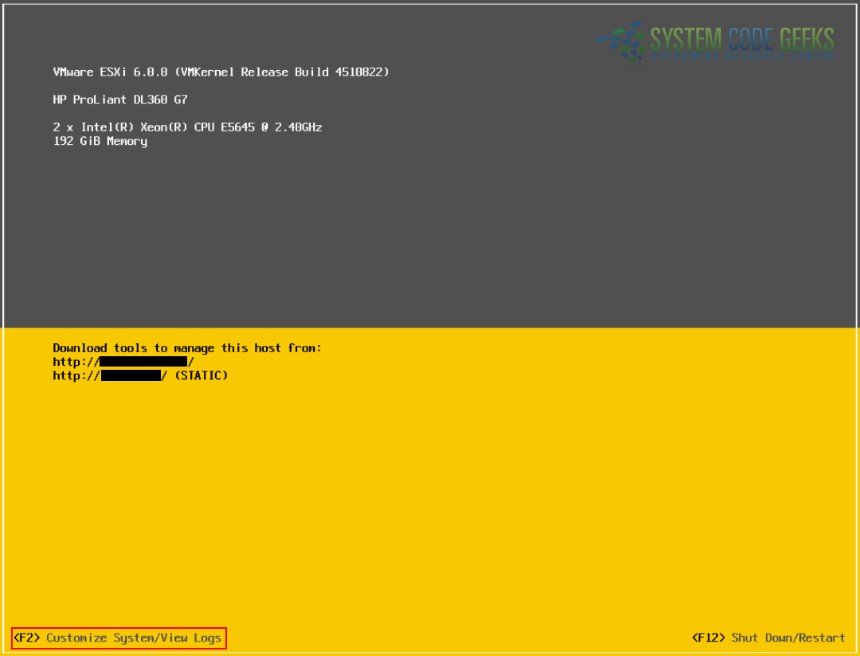
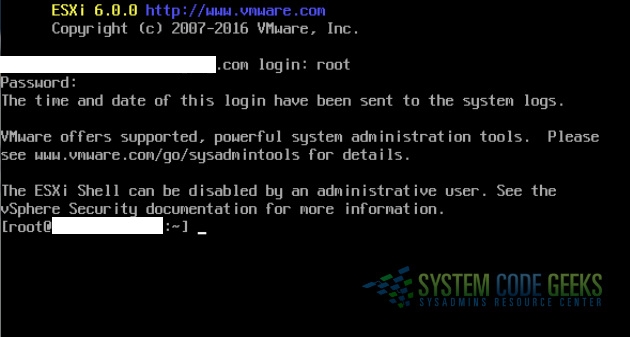
NOTE: If your screen does not look like the one in Figure 1a above, you are likely seeing an “ESXi Shell” window (Refer to Figure 1b below). If your screen looks like Figure 1b below, press Alt+F2 to switch back to the DCUI window.
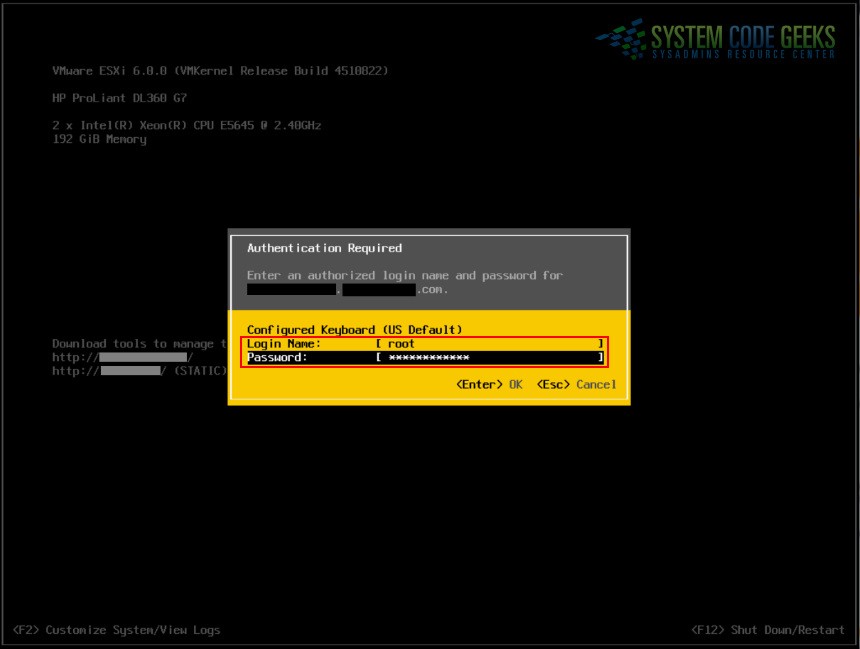
2.1.2. Authenticating the Root Account
As soon as you press F2, you will be prompted to authenticate (the default admin account is “root”). Refer to Figure 2 below:
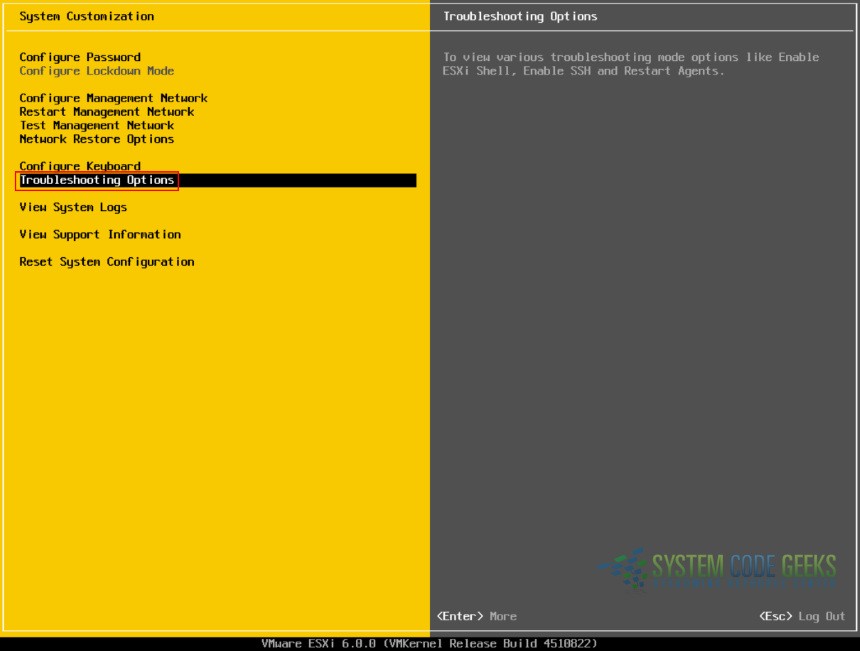
2.1.3. Access “Troubleshooting Options”
Once you’ve successfully authenticated, you’ll navigate to “Troubleshooting Options”. Refer to Figure 3 below:
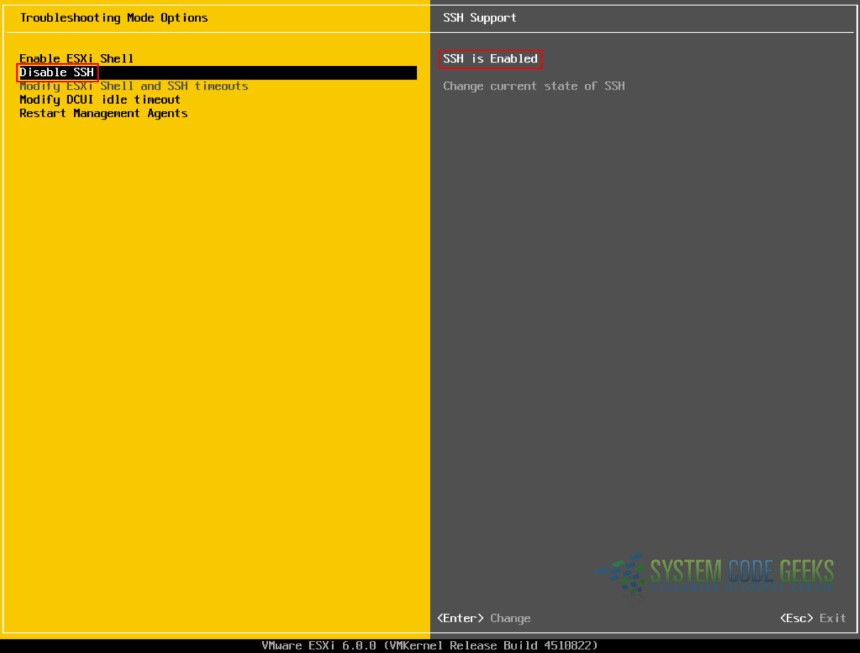
2.1.4. Enable SSH
Now you just need to verify that SSH is enabled. If it is enabled, you will see “Disable SSH” in the menu on the left, and “SSH is Enabled” on the right side of the console window. If it’s not enabled, highlight “Enable SSH” in the menu at the left and press Enter. Refer to Figure 4 below:
2.2. Enable SSH via the vSphere Client
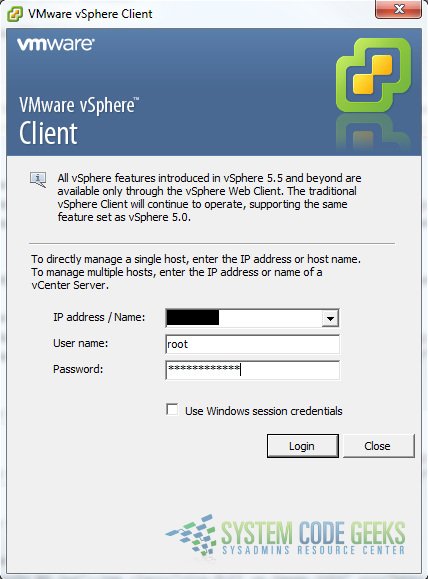
2.2.1. Authenticating the Root Account
To enable SSH via the vSphere Client, open the application, enter the server name or IP, then authenticate the root account. Refer to Figure 5 below:
2.2.2. Configuring “Services” Properties (Part 1)
Once you’re authenticated, the host should already be selected in the far left pane. Click the “Configuration” tab and select “Security Profile” under the “Software” section, then click “Properties” to the right of “Services”. Refer to Figure 6 below:

2.2.3. Configuring “Services” Properties (Part 2)
Once you’ve clicked “Properties”, a new “Services Properties” window will open. Select “SSH” and click the “Options” button. Refer to Figure 7 below:

2.2.4. Configuring SSH Options
Once you’ve clicked “Options”, a new “SSH Options” window will open. Make sure that the “Start and stop with host” radio button is selected, and if the current status of the service is not “Running”, you’ll need to click the “Start” button. Notice that when the service is running, the Start button will be greyed out. Refer to Figure 8 below:

2.3. Enable SSH via the vSphere Web Client
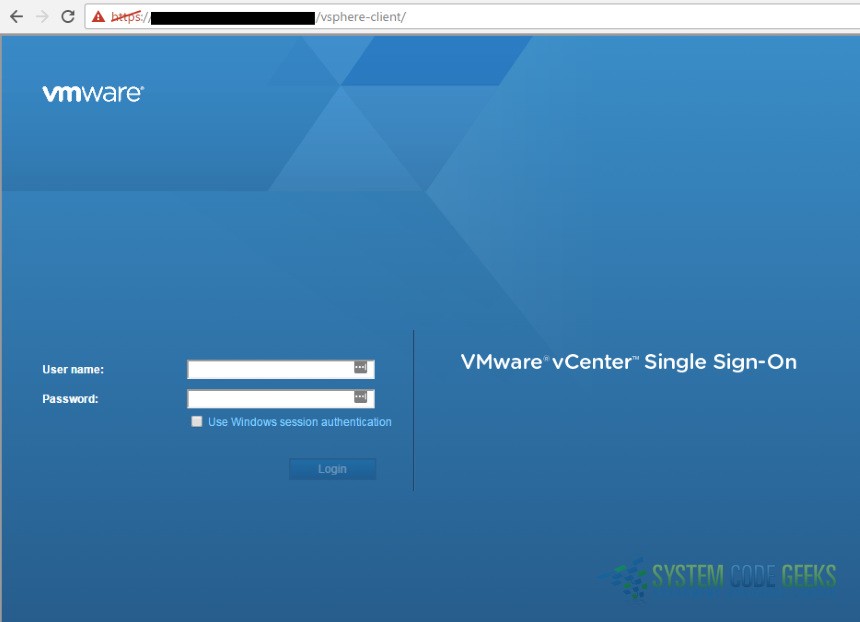
2.3.1. Authenticating the Administrator Account
NOTE: This option is only possible if you’ve deployed a vCenter server in your VMware environment.
Login to the vSphere Web Client console by navigating to the following address via a web browser (substituting “<fqdn>” with your server’s appropriate fully qualified domain name):
https://<fqdn>/vsphere-client/
Login with the appropriate admin credentials. Refer to the example logon screen in Figure 9 below:
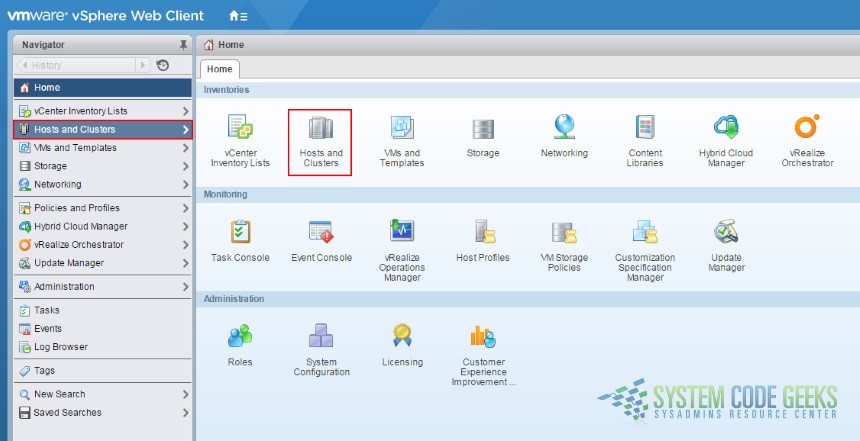
2.3.2. Access the appropriate ESXi host
Once you’ve successfully authenticated, you’ll be at the “Home” page of the web console. Click on “Hosts and Clusters” from the left menu or from the main navigation pane (either one will work; they both launch the same navigation options). Refer to Figure 10 below:
2.3.3. Configuring “Services” Properties
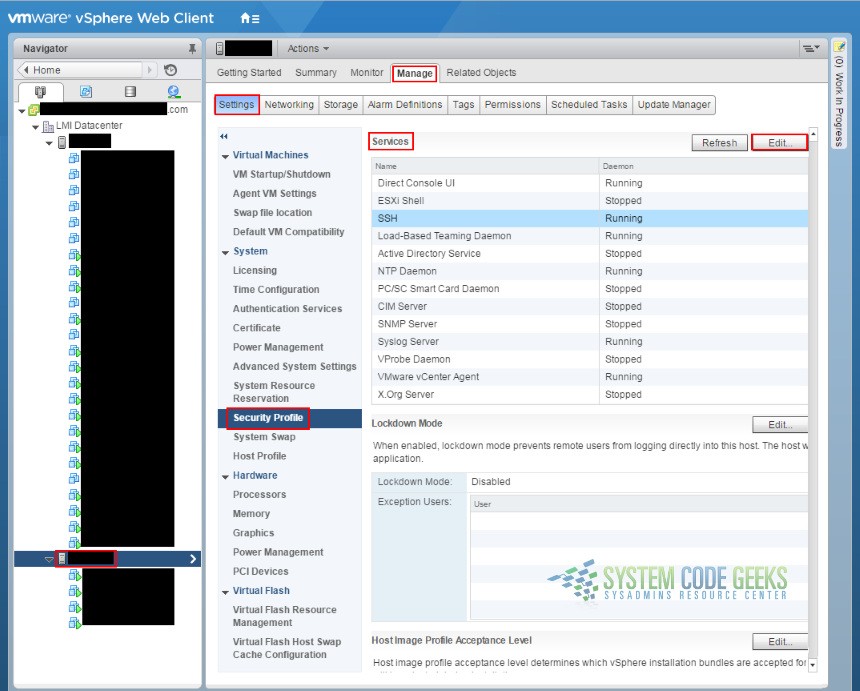
After you select “Hosts and Clusters”, you’ll need to drill down into your datacenter and select your appropriate ESXi host (notice that mine is selected in the left side navigation menu in the example screenshot below). Then click the “Manage” tab, choose “Settings”, then “Security Profile” under the “System” menu. You’ll see “Services” in the main navigation pane on the right. Click the “Edit” button to the right of that. Refer to Figure 11 below:
2.3.4. Configuring SSH Options
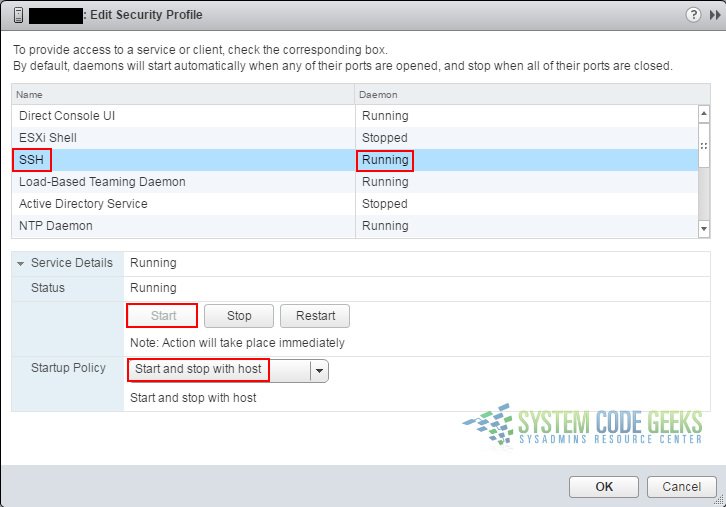
Once you’ve clicked “Edit”, a new “Edit Security Profile” window will open. Select “SSH” (make note of whether the service is “Running” or “Stopped”) and choose “Start and stop with host” from “Startup Policy”. If the service isn’t running, click the “Start” button. Notice that when the service is running, the Start button will be greyed out. Refer to Figure 12 below:
Once SSH has been successfully enabled, you’re ready to access the server via SSH.
3. Access your ESXi host via SSH
I won’t go into detail about how to SSH into your server, but I’ll at least mention the free SSH client that I use: PuTTY.
Now you’re ready to start configuring the SNMP options!
4. Configuring ESXi SNMP Options
There are various SNMP options that can be configured, including ones that utilize extra security options, but as stated in the introduction of this article, I’ll be covering the options involving SNMP v1.
NOTE: SNMP v1 (instead of v2 or v3) is the easiest to setup because it only requires the most basic of communities (“public”). However, it’s the least secure version of SNMP since it doesn’t utilize authentication or any privacy controls. With that said, if someone with true hacking skills has access to your network, SNMP configurations will likely be one of the least of your concerns.
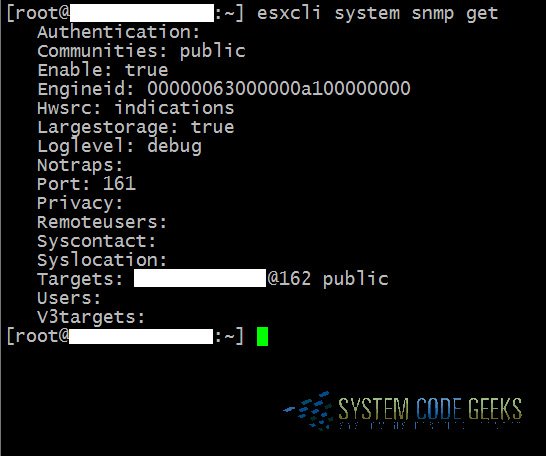
To check the current SNMP configuration at any time (either before or after making changes), you can type:
esxcli system snmp get
You will see output similar to what’s displayed in Figure 13 below:
4.1 Create an SNMP community
Before SNMP can even be enabled, the first thing you need to do is create a “community”. Since we’re using SNMP v1 in this article, we’ll create the default community of “public”. To do this, type the following command:
esxcli system snmp set -c public
4.2 Configure an SNMP trap
In the environment where I work, we have our ESXi hosts configured to send SNMP trap data to our Kiwi syslog server. If you’d like to configure a trap for your ESXi host to send its SNMP data to, this can be done by typing the following command (substitute <trap_server_ip> with your appropriate trap server’s IP):
esxcli system snmp set -t <trap_server_ip>@162/public
NOTE 1: SNMP uses the default UDP port 161 for general SNMP messages and UDP port 162 for SNMP trap messages.
NOTE 2: You can add multiple targets as well, separated by commas. Here’s an example:
esxcli system snmp set -t <server_ip_1>@162/public,<server_ip_2>@162/public
4.3 Configure the logging level
NOTE: There are four levels of logging to choose from: debug|info|warning|error (“debug” has the highest level of verbosity, and “error” has the lowest).
Set the logging level using the following command:
esxcli system snmp set -l debug
4.4 Enable SNMP
It’d be crazy to configure all of this and not have SNMP enabled, so make sure that it’s enabled by typing the following command:
esxcli system snmp set -e true
4.5 Send a test trap
The last thing left to do is to send a test trap to verify that the agent is configured correctly:
esxcli system snmp test
You should see something similar to this if it was successful (see Figure 14 below):

5. Summary
As you’ve hopefully learned from this article, first-time SNMP configuration options in ESXi are not as hard or as complicated as they may initially seem. It does however require understanding the basics of what SNMP can be used for, how to effectively manage your vSphere ESXi server via SSH and the DCUI console, and how to properly leverage commands from the SSH shell in order to successfully configure ESXi SNMP options.
