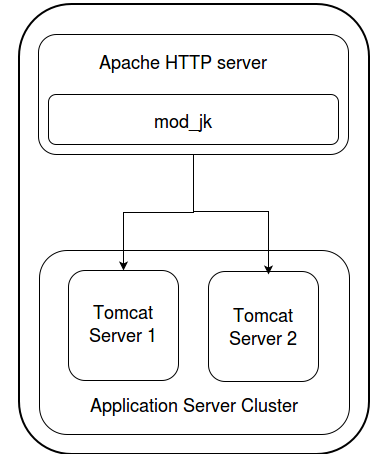
In this article I will go through a common set-up for a small production environment. A single tier, load balanced application server cluster.
Overview
A high level overview of what we will be doing.
- Downloading and installing Apache HTTP server and mod_jk
- Downloading Tomcat
- Downloading Java
- Configuring two local Tomcat servers
- Clustering the two Tomcat servers
- Configuring Apache to use mod_jk to forward request to Tomcat
- Deploying application to Tomcat server that tests our set-up
Introduction
What is Apache?
Apache is an HTTP server.
What is mod_jk?
It is an Apache module that allows AJP communication between Apache and a back end application server like Tomcat.
I am running this on Ubuntu 14.04LTS installed on a dual boot PC with Windows 7.
Download Apache2
We are going to use Ubuntu’s APT package maintenance system to obtain and install Apache2.
sudo apt-get install apache2
This will install in /etc/apache2
Download and install mod_jk
The mod_jk module is not included in the Apache2 download so must be obtained and installed separately. The installation requires that the mod_jk module is visible to Apache and configured to ensure that Apache knows where to look for it and what to do with the requests you want to proxy.
sudo apt-get install libapache2-mod-jk
This will install in /etc/libapache2-mod-jk also two files have been added to the /etc/apache2/mods-available folder.
Downloading and installing Tomcat 8
At the time of writing this Tomcat 8 does not have a package in APT so you must download the binaries from the tomcat website.
http://tomcat.apache.org/download-80.cgi select the appropriate binary distribution and extract it as follows.
tar xvzf apache-tomcat-8.0.5.tar.gz
We need two copies of the Tomcat server to be load balanced. I created two directories in the /opt/ location: /opt/tomcat-server1/ and /opt/tomcat-server2/ and copied tomcat into each one.
Download and install Java
Download Java from APT as follows:
apt-get install openjdk-7-jdk
and set JAVA_HOME in .bashrc
vim ~/.bashrc
export JAVA_HOME=/usr/lib/jvm/java-7-openjdk-amd64
Configure two local Tomcat servers
We will edit only the server.xml of the server2 installation of tomcat. We need to change port numbers to avoid conflicts.
We change the following:
<Server port="9005" shutdown="SHUTDOWN">
<Connector port="9009" protocol="AJP/1.3" redirectPort="9443"/>
and comment out the HTTP Connector as we only want the web application to be accessible through the load balancer.
Here is my server2 Tomcat server.xml configuration.
Configure mod_jk
Load balancing is configured in the workers.properties file, located /etc/libapache2-mod-jk/ where workers represent actual or virtual workers.We will define two actual workers and two virtual workers which map to the Tomcat servers. In the worker.list property I have defined two virtual workers: status and loadbalancer, I will refer to these later in the Apache configuration.
Workers for each server have been defined using values for the server.xml configuration files. I used the port values for the AJP connectors and I have included an lbfactor that sets the preference that the load balancer will show for that server.
Finally we define the virtual workers. The loadbalancer worker is set to type lb and set the workers that represent the Tomcat servers in the balancer_workers properties. The status only needs to be set to type status.
worker.list=loadbalancer,status

worker.server1.port=8009
worker.server1.host=localhost
worker.server1.type=ajp13

worker.server2.port=9009
worker.server2.host=localhost
worker.server2.type=ajp13

worker.server1.lbfactor=1
worker.server2.lbfactor=1

worker.loadbalancer.type=lb
worker.loadbalancer.balance_workers=server1,server2

worker.status.type=status
Ensure that you remove any other worker configuration that are not being used.
Configure Apache Web Server to forward requests
You will need to add the following to the Apache configurations located in etc/apache2/sites-enabled/000-default.conf
JkMount /status status
JkMount /* loadbalancer
Verify the installation
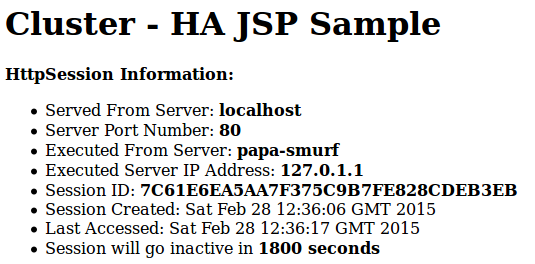
To test that all has been configured correctly we need to deploy an application. A sample application that has been used for years to test such configurations is called the ClusterJSP sample application. You can find it by googling in or from the JBoss site.
Now deploy the war to the webapps folder on both servers and start each server using the start-up script /opt/tomcat-server1/bin/startup.sh.
Go to http://localhost/clusterjsp/HaJsp.jsp and you should see the page show HttpSession information.
Now lets look at the mod_jk status page: http://localhost/status. You will see that this page shows information about the load balancer workers and the workers it is balancing.

If everything is working you will see the worker error state show OK or OK/IDLE if they are not currently balancing load.
Things to try out
Enable sticky sessions: Configure jvmRoute in the server.xml configuration.
Further reading
- Loadbalancing with mod_jk and Apache
- Working with mod_jk
- Connecting Apache’s Web Server to Multiple Instances of Tomcat
| Reference: | Set up Tomcat, Apache and mod_jk cluster from our SCG partner Alex Theedom at the alex.theedom blog. |
