After switching from Windows to macOS I was looking for a simple screenshots taking tool to support my daily workflow. The built-in tools offered by macOS are not sufficient for me, mainly because of the image annotating tools and limited keyboard shortcuts support. For couple of days I used Skitch, but then I found Annotate, a light-weight and simple app with quite good keyboard shortcuts support. In this short blog post, I share how I currently work with Annotate app.
Note: Looking for a powerful screenshots taking tool for Windows? Checkout Greenshot.
Why built-in tool are not sufficient?
What is my usual screenshots workflow?
- Take a screenshot, annotate it quickly with tools like arrow, shape and text, copy to clipboard and paste it anywhere (e.g. Slack, JIRA, e-mail or a document editor)
- Open an image from clipboard, annotate it quickly, copy to clipboard and paste it anywhere
With Annotate this is all possible and it can be done pretty quickly with keyboard shortcuts.
Taking screenshots with keyboard shortcuts
In my workflow, I disabled standard macOS CMD+SHIFT+4 shortcut (Save picture of selected area as a file) and set it as Crosshair snapshot shortcut in Annotate. I also disabled Windows snapshot shortcut in Annotate, as the crosshair snapshot is powerful enough and provides possibility to select window (just press spacebar while in a crosshair mode to capture any window).
My settings:
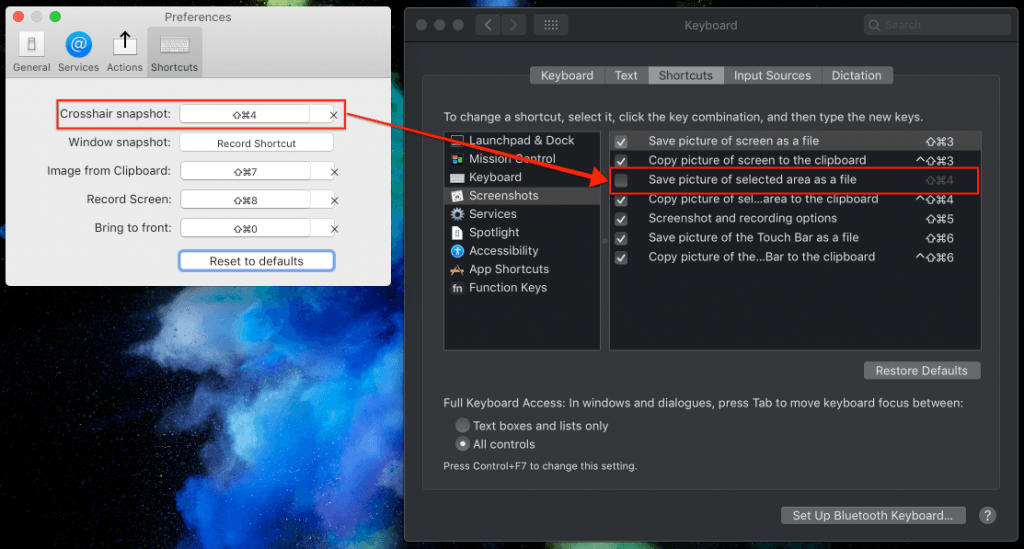
With the above, I can use standard macOS screenshots shortcuts while having the option to use Annotate – after screenshot is taken it won’t be saved, but opened by Annotate.
Note: Don’t forget to run the tool at login.
Annotate with keyboard shortcuts
When the screenshot is opened in Annotate you can annotate with some basic tools like arrow, text, shape, pencil. You can also blur selected area or you can crop the image.

All of these tools can be accessed with the keyboard shortcuts:
A– arrowT– textO– overlayS– shapeP– pencilC– cropB– blur
Copy to clipboard
One of the most used scenario for me is copying the screenshot to clipboard and pasting it e.g. either to JIRA issue or to Slack etc. Simply use CMD+SHIFT+C to copy the image to clipboard. Of course, with Annotate you can save the image to disk as well as include it in the message or email.
Note: There are issues with external services like Facebook, Twitter or Dropbox at this moment.
Open from clipboard
If you want to open any image from clipboard with Annotate use CMD+SHIFT+7 shortcut (can be changed in settings). I find this option very useful, as in many cases I copy the image from the website, a chat etc. and then I can quickly open it and annotate.
Most common workflow for me
- Create a screenshot:
CMD+SHIFT+4 - Add a rectangle using
S - Add an arrow with
A - Add some text with
T - Blur selected part of the screen with
B - Copy the image to clipboard with
CMD+SHIFT+C - Close the window with
CMD+W
Note: Using a mouse or trackpad is still required.
Drawbacks
As I stated earlier, there are issues related to using Annotate with external services like Facebook, Twitter or Dropbox and it looks like they may not be addressed by the developers as the app is not actively maintained: last update on Sep 20, 2016!
Summary
I really enjoy using Annotate so far and not working integration with external services is not an issue for me at this moment. For sure I keep my eyes opened and if I find something better I may run away from Annotate.
Published on System Code Geeks with permission by Rafal Borowiec, partner at our SCG program. See the original article here: Annotate – simple yet productive screenshots tool for macOS Opinions expressed by System Code Geeks contributors are their own. |
