This article is part of our Academy Course titled PostgreSQL Database Tutorial.
In this course, we provide a compilation of PostgreSQL tutorials that will help you set up and run your own database management system. We cover a wide range of topics, from installation and configuration, to custom commands and datatypes. With our straightforward tutorials, you will be able to get your own projects up and running in minimum time. Check it out here!
In the previous articles of this series, we have learned several PostgreSQL database management skills. So far, those skills have only included working with one database on one machine only. Today we will explain how to set up database replication, with a master machine and a slave one, in order to provide redundancy.
In particular, we will use an approach known as hot standby, that allows to run read-only queries on a replicated database (residing on a separate machine) while the main one is under maintenance. Hot Standby is available in PostgreSQL starting with version 9.0.
Given the nature of the topic at hand, we will need an extra Ubuntu server. We will call it “slave” and will change its hostname to ubuntu-slave and set its IP address to 192.168.0.55. The master server (192.168.0.54 – the one we have been using until now) will be renamed to ubuntu-master. We will begin this article by outlining step by step the prerequisites for the setup, so you should not run into any significant issues.

1. Step 0 – Change hostnames and IP addresses as needed
In the master machine, do:
hostnamectl set-hostname ubuntu-master
Next, edit /etc/hosts as follows:
127.0.0.1    ubuntu-master
192.168.0.55    ubuntu-slave
In the slave machine:
hostnamectl set-hostname ubuntu-slave
Then edit /etc/network/interfaces and make sure the configuration for enp0s3 (the main NIC) looks as follows:
iface enp0s3 inet static
address 192.168.0.55
netmask 255.255.255.0
gateway 192.168.0.1
dns-nameservers 8.8.8.8 8.8.4.4
Next, edit /etc/hosts as follows:
127.0.0.1        ubuntu-slave
192.168.0.54    ubuntu-master
Finally, restart the network service on both machines
systemctl restart networking
and logout, then log back in to apply changes.
Now we’re ready to talk.
2. Step 1 – Configuring the master
To begin, we will create a dedicated user (repuser in this case) and we will limit the number of simultaneous connections to 1. Enter the psql command prompt and do:
CREATE USER repuser REPLICATION LOGIN CONNECTION LIMIT 1 ENCRYPTED PASSWORD 'rep4scg';
In /etc/postgresql/9.5/main/postgresql.conf, make sure the following settings and values are included:
listen_addresses = 'localhost,192.168.0.54'
wal_level = 'hot_standby'
max_wal_senders = 1
hot_standby = on
and in /etc/postgresql/9.5/main/pg_hba.conf:
hostssl replication repuser 192.168.0.55 md5
Next, switch to user postgres, generate a public key and copy it to the slave. This will allow the master to replicate automatically to the slave:
ssh-keygen -t rsa
ssh-copy-id 192.168.0.55
When prompted to enter the password for user postgres in the slave machine, do so before proceeding.
Now restart the database service:
sudo systemctl restart postgresql
3. Step 2 – Configuring the slave
Make sure the database service is stopped before proceeding. Otherwise, you’re in for a nasty database corruption in a few moments.
systemctl stop postgresql
Then edit /etc/postgresql/9.5/main/postgresql.conf and make sure the following settings / values are included:
listen_addresses = 'localhost,192.168.0.55'
wal_level = 'hot_standby'
max_wal_senders = 1
hot_standby = on
Finally, add the following line to /etc/postgresql/9.5/main/pg_hba.conf:
hostssl replication repuser 192.168.0.54 md5
4. Step 3 – Performing the replication
This step consists in two sub-steps:
3a- In the master, run the following commands to start an initial backup of all databases currently residing in our server, excluding the logs (you can choose a different backup identification instead of Initial backup). If the destination files exist, they will be updated in place; additionally, the data will be compressed during the transfer – this may come in handy if you have several large databases (otherwise, feel free to ignore the -z option of rsync).
psql -c "select pg_start_backup('Initial backup');"
rsync -cvaz --inplace --exclude=*pg_xlog* /var/lib/postgresql/9.5/main/ 192.168.0.55:/var/lib/postgresql/9.5/main/
psql -c "select pg_stop_backup();"
3b- In the slave, create a .conf file with the connection info to the master server. We will name it recovery.conf and save it in /var/lib/postgresql/9.5/main:
standby_mode = 'on'
primary_conninfo = 'host=192.168.0.54 port=5432 user=repuser password=rep4scg'
where user and password need to match the credentials created at the beginning of Step 1.
Now we can proceed to start the database server in the slave:
sudo systemctl start postgresql
and test the replication in the next step.
5. Step 4 – Testing the replication
In the master, we will switch to user postgres and execute a simple query to SELECT and then update a record from the city table in the World_db database. At the same time, we will query that same record in the slave before and after performing the UPDATE in the master. Refer to Fig. 1 for more details:
sudo -i -u postgres
psql
\c World_db;
then
SELECT name, countrycode, population FROM city WHERE name='Brisbane';
UPDATE city SET population=1402568 WHERE name='Brisbane';
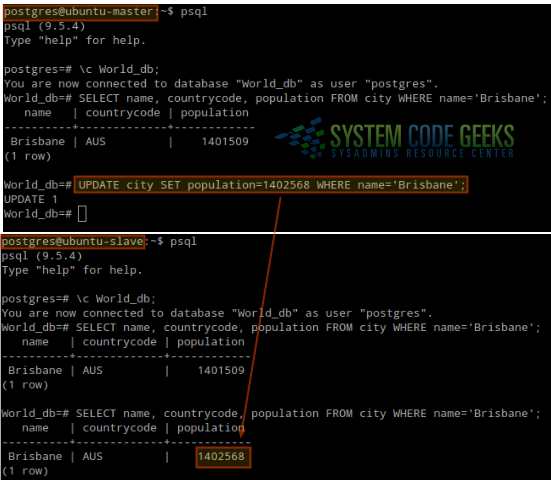
As you can see, the slave was updated automatically the population for Brisbane was changed in the master. If you attempt to perform an UPDATE from the slave, it will fail with the following error: “ERROR: cannot execute UPDATE in a read-only transaction.”
6. Troubleshooting
If the database service refuses to start successfully, you will not be able to run psql in the Linux command line. In that case, you will have to troubleshoot using the following resources:
systemctl -l status postgresql@9.5-main
journalctl -xe
tail -f /var/log/postgresql/postgresql-9.5-main.log
That’s all folks! You should have a PostgreSQL hot standby replication in place.

Topic is poorly disclosed.
What else types of sync exists, what its advantages and disadvantages?
What happen if master node is down?
What happen if slave node is down?
How to update failed node to master state after startup?
I hope these themes will be discussed in comments or future topics.
Thanks.