This article is part of our Academy Course titled PostgreSQL Database Tutorial.
In this course, we provide a compilation of PostgreSQL tutorials that will help you set up and run your own database management system. We cover a wide range of topics, from installation and configuration, to custom commands and datatypes. With our straightforward tutorials, you will be able to get your own projects up and running in minimum time. Check it out here!
In the previous tutorials of this series (“PostgreSQL: Introduction and installation” and “PostgreSQL commands and datatypes”) we explained how to load a sample database (World_db) into our PostgreSQL server and how to get help with both SQL and psql commands.
In real-world scenarios, you will need to perform CRUD (Create, Read, Update, and Delete) operations on database tables all the time. In this post we will learn how to do U (updates) and D (deletes), and show how to clean up the database by removing the left overs resulting from these operations. As we will see in a moment, PostgreSQL provides an effective garbage collector for this.
Without going into the nitty-gritty of what happens under the hood, we can mention briefly that the previous versions of updated records or deleted table entries are not actually removed from the database. Think about the need to rollback a given transaction and this will make sense. They are just “not visible” anymore by regular means, and they keep contributing to the amount of used hard disk space until a clean-up is performed using the VACUUM psql command. Let’s take a look at it in greater detail later.

Updating and removing rows
Using the World_db database, let’s update by 7% the population of all cities in the city table. Before we do that, let’s take a look at the impact this operation would have on the current data by using a basic SELECT statement.
We will print the city name, its current population, and the population after our proposed update. To round the population increase to the nearest integer, we will use the ROUND function as shown in Fig. 1:
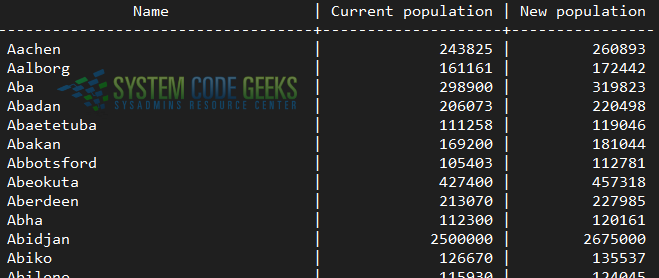
SELECT name AS "Name", population AS "Current population", ROUND(population * 1.07) AS "New population" FROM city ORDER BY name;
Now let’s do the actual update. In this case we will not use a WHERE clause as we actually want to update all cities. This will result in the population update of all 4079 cities currently present in the city table, as we can see in Fig. 2:
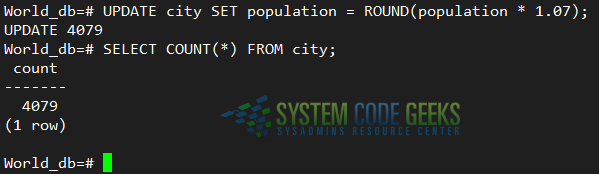
UPDATE city SET population = ROUND(population * 1.07);
Now let’s delete all Australian cities where the Id is greater than 135 (this will exclude Canberra, the capital, which is referenced in the country table). As before, use a SELECT first to examine the records that will be deleted:
SELECT name FROM city WHERE countrycode='AUS';
If you’re OK with it, then proceed with the DELETE operation:
DELETE FROM city WHERE Id BETWEEN 136 AND 143;
Refer to Fig. 3 for details:

On tables that are heavily updated or where removals are performed constantly, this will translate into a lot of wasted disk space. Keep in mind that when you perform an update on a table or remove a record, the original is kept in the database.
Introducing VACUUM
To formally introduce VACUUM, let’s use what we learned in PostgreSQL commands and data types to display the help about this command (see Fig. 4):
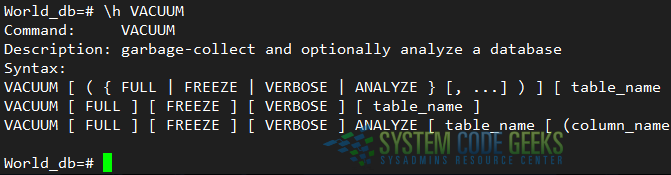
\h VACUUM;
To collect the garbage present in the database, just do
VACUUM;
However, that will not free up the space used by the old records back to the operating system – it will only clean up the old records and then make the space available to be reused by the same table. On the other hand,
VACUUM FULL;
will ensure that whatever space is freed up will be returned to the operating system.
Additionally,
VACUUM FULL VERBOSE;
will also display messages about what’s going on.
That said, let’s perform a full, verbose vacuum on the city table (refer to Fig. 5 for details):

VACUUM FULL VERBOSE city;
As you can see above, VACUUM located and removed the space left behind by the deletion of the 8 records from the city table earlier. On large scale updates and removals, this will translate into considerable space disk savings.
As good as the VACUUM command is, having to run it manually could become a tedious task. Thus, by default, there’s an AUTOVACUUM daemon that is enabled and does the job for you automatically while the database server is running. You can find more details about its operations in the AUTOVACUUM PARAMETERS section of the main configuration file /etc/postgresql/9.5/main/postgresql.conf.
You can verify that the AUTOVACUUM process is running with:
ps aux | grep autovacuum | grep -v grep
Summary
Freeing up space in tables that are constantly updated or where records are often deleted not only will help you save space, but also improve the performance of queries performed on the table. Following the instructions shared in this article you will be contributing to the health of your database and saving valuable storage space.
