This article is part of our Academy Course titled Nagios Tutorial for IT Monitoring.
In this course, we provide a compilation of Nagios tutorials that will help you set up your own monitoring infrastructure. We cover a wide range of topics, from installation and configuration, to plugins and NRPE. With our straightforward tutorials, you will be able to get your own projects up and running in minimum time. Check it out here!
During the last 3 articles (“Nagios Core Installation and Configuration on Ubuntu Server”, “Using Nagios plugins and NRPE to check network services and metrics on remote hosts”, and “Nagios monitoring through SNMP”), we introduced you to Nagios Core and explained how to monitor network devices and servers via plugins and the Simple Network Management Protocol (SNMP).
In the ecosystem of monitoring tools, there are other heavyweights you may want to consider using in your environment. Centreon and Icinga, which we will explore in this guide, are two examples. Both being open source applications, they allow you to lower the Total Cost of Ownership (TCO) for your business while still providing effective solutions for system administrators.
We will begin by introducing Icinga and Centreon, to later highlight some of the similarities and differences between them and Nagios. However, please note that this article is not intended to be an exhaustive installation guide nor provide a detailed configuration help for either Centreon or Icinga. Our expectation is to give you enough info so as to help you make an informed decision when choosing a network monitoring system.

Introducing and installing Icinga
Originally started as a fork of Nagios in 2009, Icinga aimed to overcome certain flaws in the then-current development process of Nagios, fix bugs, and add new features required by the community as well, including a more modern web interface, an improved Service Level Agreement (SLA) reporting module, and connectors for several Relational Database Management Systems (Oracle, MySQL / MariaDB, and PostgreSQL).
Although the first version of Icinga (Icinga 1) was a Nagios fork, Icinga 2 was written from scratch in an attempt to eliminate the issues that existed because of the inherited Nagios code base.
You can choose to install Icinga either from the Ubuntu default repositories (v1) or from the Icinga Personal Package Archives (PPA, v2). Icinga 1 is only being currently maintained for security and bug fixes, but other than that it is not under active development anymore.
sudo service nagios stop
sudo rm /etc/rcS.d/S99nagios
If you choose to undo this after trying Icinga, you can restart and enable Nagios again as explained in Nagios Core Installation and Configuration on Ubuntu Server.
As explained above, the safest choice for a new Icinga installation is version 2, which you can install as follows:
sudo add-apt-repository ppa:formorer/icinga
sudo apt-get update
sudo apt-get install icinga2 icinga2-classicui icinga2-doc icinga2-ido-mysql mysql-server libdbd-mysql mysql-client
During the installation process, you will be prompted to enter the following information:
- The password for the Icinga administrator user (icingaadmin).
- Configure a database for Icinga. This will allow to import Icinga status messages into a SQL (MySQL or PostgreSQL) database.
- Enter the desired password for the MySQL administrative account.
- Enter a password for icinga2-ido-mysql to register with the database server. If you leave this field blank, a random password will be generated.
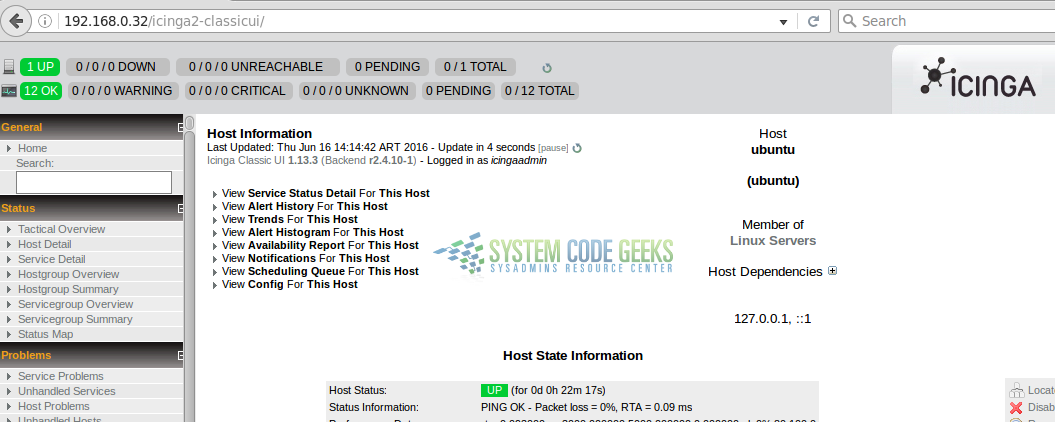
Once the installation is complete, Icinga will be configured automatically on subsequent boots (a link to /etc/init.d/icinga2 was created as /etc/rc2.d/S20icinga2) and the web interface is available at http://192.168.0.32/icinga2-classicui. To login, use the password you chose for icingaadmin earlier. If you now take a couple of minutes to browse the web interface, you will realize it resembles the Nagios UI, with many of its menus and features present (see Fig. 1 for more details).
Refer to the Icinga 2 documentation if you are interested in setting up hosts and services to be monitored (by default, it will only monitor the local system and classic metrics such as disk space usage, number of processes, logged on users, and system packages for which a newer version is available.
Introducing and installing Centreon
Perhaps what makes Centreon stand out from the crowd of the plethora of monitoring tools is the fact that it is distributed as an ISO. In addition, it is installed as a standalone Linux distribution -instead of a package- as opposed to Nagios and Icinga.
To install Centreon, download the ISO from the project’s website (click on Get Centreon 3.3 → Direct download), and burn it to a DVD. Alternatively, you may want to install it on Virtualbox as you would with a regular Linux distribution. This is, in fact, the case, as Centreon 3.3 (the latest version) is built on a CentOS 6.7 operating system.
During the installation process you will be prompted to decide which kind of Centreon server you want to configure. Choose the default (Central server with database) as shown in Fig. 2.

After installing Centreon, you will need to:
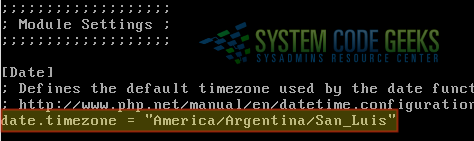
1) Set your timezone (if you didn’t do so earlier) in the /etc/php.ini file. Fig. 3 shows the relevant line and my choice of timezone (America/Argentina/San_Luis). You can pick the timezone that matches your location from the List of Supported Timezones:
2) Run mysql_secure_installation to set a password for the MariaDB root user (you will need this later to complete the configuration of Centreon). Other than this, you may either accept the default settings presented by the procedure, or use your own.
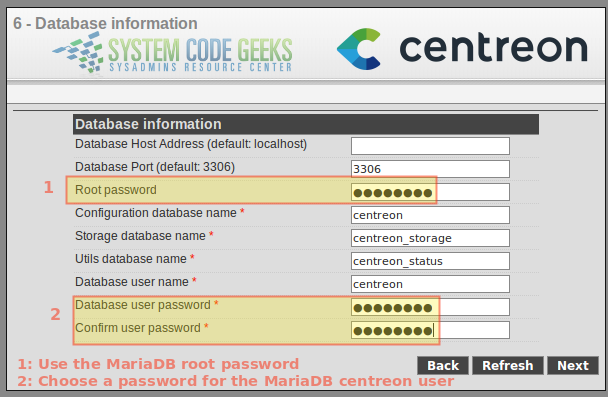
3) Launch a web browser and point it to the IP of the Centreon server followed by /centreon (http://192.168.0.50/centreon for example) and you will be taken through a series of steps to complete the configuration. Among other things, you will be asked to enter
- Password, full name, and email of the Centreon admin.
- MariaDB root password, and an additional password for the MariaDB centreon user, as shown in Fig. 4:
After this, you will be taken to the login page, where you will need to use the credentials of the Centreon admin user (not the MariaDB one). Upon successful login, you will see the initial dashboard where no hosts or services have been added yet.
- a) Set a password for the centreon Unix user account:
passwd centreon
- b) Set access over ssh to the localhost for the centreon user:
ssh 127.0.0.1 -l centreon
Now proceed to add a host as explained here.
Finally, restart Apache and the Centreon-related services:
service httpd restart
service centengine restart
service cbd restart
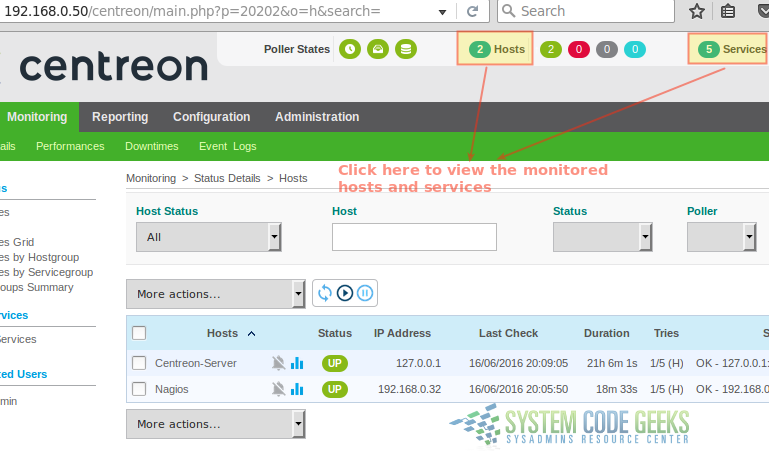
When you’re done, click on Hosts or Services at the top of the screen to view the corresponding information (see Fig. 5):
Feel free to examine the interface and play with it a little bit. Refer to the Centreon official docs for more details.
A comparison between Nagios, Centreon, and Icinga
After installing Icinga and Centreon, we are in a better position to determine which is the most appropriate solution for our monitoring needs. Here are some facts that may help you to take a decision:
- Icinga and Nagios require you to define hosts and services using plain text files, whereas in Centreon you can use the web interface directly. Chances are that you, as a sysadmin, feel comfortable using command line editors; if so, you won’t have a problem configuring hosts and services in Nagios or Icinga. But keep in mind that Centreon allows you to do the same job with only a few clicks.
- At least in my experience, Centreon is somewhat buggy and you have to dig around in forums a lot in order to get things up and running. Another way to put this is saying that it has a steeper learning curve than Nagios or Icinga. For example, it took me a lot of searching before I found out you have to generate the configuration and export it to the monitoring engine each time you add / update / delete a new host or service before changes are put into effect.
- Another downside of Centreon when compared to Nagios and Icinga is that the former does not allow to export data in the form of reports or support authentication via Active Directory, while the latter two do.
- On the bright side -and not that it actually matters- Centreon’s web interface is more polished than Nagios’ or Icinga’s.
- Last, but not least, is the licensing terms and available support. For paid versions, Nagios and Centreon provide user support and training, with Nagios being the least expensive alternative (< $2500 vs. +$3000 per year for 1000 monitored hosts and one central server). Icinga, on the other hand, is supported by the community but has the advantage of providing all the features of Nagios and more.
Summary
In this article we have explored Icinga and Centreon as two alternatives to Nagios. With the pros and cons of each solution, you will be able to make an informed decision when choosing a monitoring tool for your network. Hope it helps.

There are some little errors: – with centreon, you can do LDAP authentification (so it’s working with Active Directory). In fact, you don’t have kerberos (but others don’t do it also). For Kerberos Auth, you should use a websso solution (centreon can be configured for websso) – “Centreon when compared to Nagios and Icinga is that the former does not allow to export data in the form of reports”: you have simple dahsboarding with Centreon. For complex dashboarding, you need to have centreon-mbi solution. – Centreon doesn’t have a support price on hosts monitored. I think it’s difficult to compare… Read more »
@ulkesh,
Please refer to the following comparison document: https://assets.nagios.com/datasheets/compare/How_Nagios_Compares_To_Centreon.pdf
I agree with you, however, that it is difficult to properly compare these 3 tools – but I did my conscious best :).