In this post, we feature Virtualization with VirtualBox. This article is part of our Academy Course titled VirtualBox Tutorial: Virtualization Essentials.
In this course, we provide a compilation of VirtualBox tutorials that will help you get started with this virtualization platform. We cover a wide range of topics, from installing the software and performing a basic configuration, to cloning, exporting, importing, and removing virtual machines. With our straightforward tutorials, you will be able to get your own Virtual Machines up and running in minimum time. Check it out here!
Although the concept of virtualization has been around since the 1960’s, it wasn’t until recent (10-15) years that it became a well-known term in the IT industry. In simple terms, virtualization allows to create several virtual resources (known as virtual machines or guests) on top on physical hardware (which is known as the host).
Through the use of virtualization software (also known as Virtual Machine Monitor, VMM, or hypervisor), the host allows each guest to utilize its computing resources (a portion of storage space, RAM, CPU time, and one or more network interfaces, to name a few examples). Thus, hardware maintenance costs and required physical space are reduced significantly, while making it possible for related applications (i.e. a web server and a database server) to run on separate “boxes” to improve security and stability.
Introducing VirtualBox
VirtualBox is a popular virtualization solution for both enterprise and personal use. In addition, it is distributed at no cost under the terms of version 2 of the GNU General Public License (GPL v2), and is available for 32 and 64-bit platforms. VirtualBox currently can run on Linux, Windows, Macintosh and Solaris hosts and supports a wide variety of operating systems as guests. In other words, by installing and using VirtualBox on your computer you can run several virtual machines on top of it – each one with its own operating system, while sharing the physical resources provided by the underlying hardware.
To enhance one’s experience with VirtualBox, two types of additional software are provided:
- Guest additions are drivers and applications that optimize the communication and integration between host and guest and improve the usability of the guest operating system (shared clipboard and folders between host and guests, mouse pointer integration, support for multiple screen resolutions, to name a few examples). Without the guest additions, these features are not present.
- Extension packs provide additional functionality to support USB 2.0 and 3.0 integration between the host and guests (allowing a guest to use an USB drive or device connected to the host, such as a webcam), virtual remote desktop (meaning a virtual machine can run on one host but be displayed and controlled from a separate computer), and encryption for disk images.
We will now explain how to install VirtualBox along with the guest additions and the extension pack.
Installing VirtualBox
Both the guest additions and the extension packs are distributed as one software resource each, and can be easily installed along with VirtualBox. However, let us keep in mind that as the word suggests, the guest additions should be installed on a per guest basis, as opposed to the extension pack which is supposed to be integrated with the main VirtualBox installation.
To download the latest VirtualBox release for your host, go to https://www.virtualbox.org/wiki/Downloads and choose your operating system version and architecture.
- If you are running Microsoft Windows Vista SP1 or newer on the host, the installation file will consist of a .exe file. Double click on that file to install VirtualBox with the default settings by pressing the Next button a couple of times.
- If you are running Linux on your host, the installation command will vary depending on the distribution family. For Fedora-based distributions you will need to do
rpm -Uvh file.rpm, whereas for Debian and derivatives you will usedpkg -i file.deb(withsudoif you’re on Ubuntu or a similar distribution). Replace file with the name of the actual installation file in your case.
Regardless of your operating system, you will then be able to launch the administration interface by double-clicking an icon on your desktop or by browsing the list of installed software on your system. It should look as shown in Fig. 1 (with the exception that the virtual machine list at the left will be empty in your case):

We will now walk you through the initial setup of an Ubuntu 14.04 desktop as your first virtual machine. Note that this will require that you download an .iso file from http://www.ubuntu.com/desktop first.
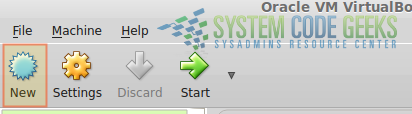
1) Open VirtualBox and click New, as shown in Fig. 2:
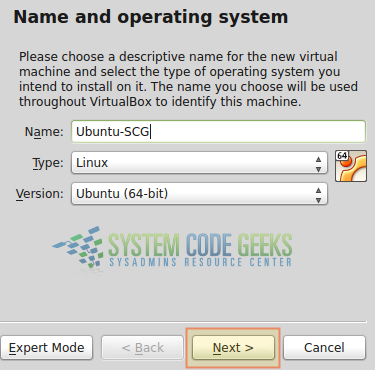
2) Choose a descriptive name for your virtual machine and make sure the right operating system and version have been detected. If not, pick the right settings from the Type and Version drop-down boxes, then click Next as indicated in Fig. 3:
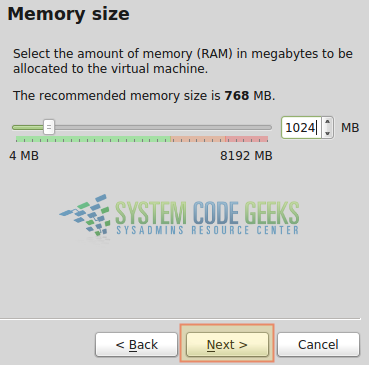
3) As you can see in Fig. 4, it’s now time to allocate a safe amount of memory for your virtual machine (feel free to allocate more than the suggested amount if you can afford to). Note that you will need to have that same amount of RAM available as it will be taken by the virtual machine when it boots; otherwise it will refuse to start.
4) The creation of the hard drive follows the same pattern as the allocation of RAM memory. Choose a space that will satisfy your needs (at least initially, because as we will see in a later tutorial, you can modify this value as well). The default choice of a Dynamically Allocated Virtual Disk Image of 8 GB in the next two steps (see Fig. 5) is safe and enough for our purpose:

Once you have confirmed the settings mentioned above (perhaps choosing a different disk size, which is OK if you can afford it), click the Create button to finish the configuration part of the process.
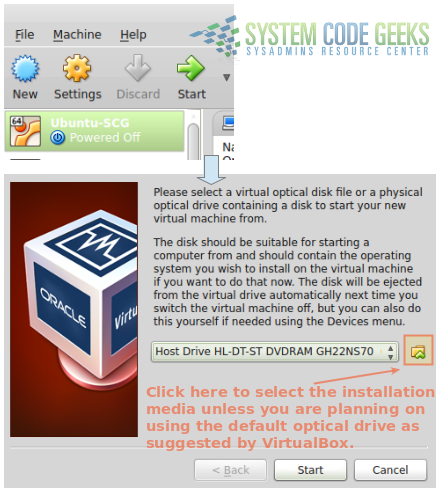
5) The virtual machine now shows at the top of the list in VirtualBox. To load the .iso file for installation, select it and click Start as shown in Fig. 6. You will be prompted to select the installation media. As you can see, this can either be an .iso file as in our case, or an optical drive such as a DVD drive where a disk containing the operating system installation files has been placed.
From this point forward, the creation of the virtual machine follows the exact same procedure as if you were performing the installation on bare metal. Once the installation completes we can proceed with the guest additions and the extension pack.
Installing the guest additions and the extension pack
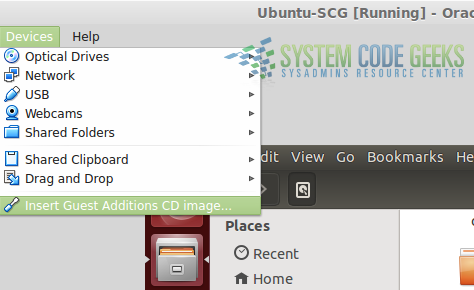
To install the guest additions on the newly created virtual machine, you will need to start it and login first. Next, go to Devices → Insert Guest Additions CD image (see Fig. 7):
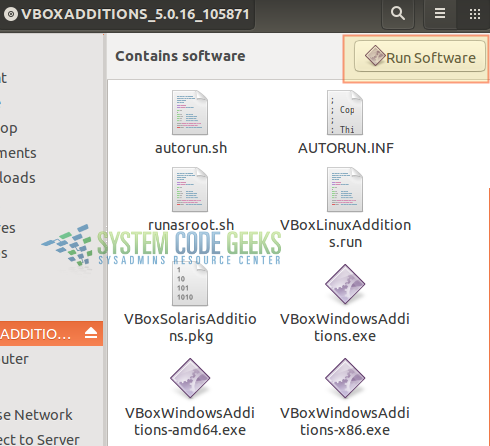
Then, use the File manager or File explorer to view the storage devices connected to the virtual machine and you will notice that a virtual CD has been added, which contains the guest additions files. As you open it, you will find inside an .exe file to install it on Windows, or a .sh script to do it on Linux and Unix-like operating systems. Double click on the right file depending on your case and follow the installation instructions as will be displayed on the screen. Fig. 8 illustrates this in our Ubuntu virtual machine (click Run software to proceed with the installation):
The guest additions will then be applied to your new virtual machine the next time it boots (for example, you will notice that the screen of the virtual machine can now be resized to occupy the entire screen of the host).
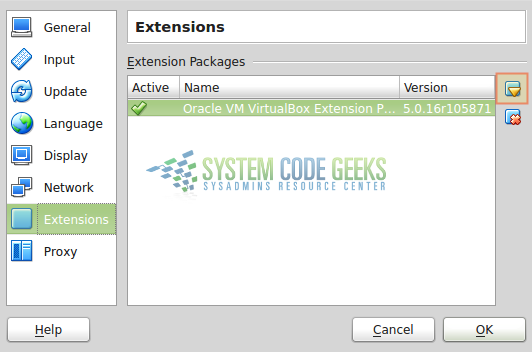
Finally, to install the extension pack you will need to download the file from the VirtualBox site (click on the All supported platforms link). Once downloaded, open VirtualBox and go to File → Preferences and then choose Extensions, as seen on Fig. 9. Click on the highlighted button to choose the location of the extension pack file and then click on OK to install it:
After reviewing the license terms, you may be prompted to enter superuser credentials or confirm that you want to perform the installation of the extension pack using administrator privileges. In any event, choose Yes and wait until the process completes.
At this point you will have the features available through the extension pack, which we mentioned earlier, in your VirtualBox installation.
Summary
In this article we have introduced you to the concept of virtualization and the features of VirtualBox to create virtual machines. As a plus, everyone with the necessary development skills is invited and welcomed to participate in the development and improvement of VirtualBox. At the same time, Oracle ensures the product meets strict quality standards. Thus, you can rest assured that this product has the capability and the potential to meet your virtualization needs, regardless of what those may be.

I have been having issues with both VirtualBox and Hyper-V installed on my Windows 10 Professional box, but not run at the same time. Am I out on left field on this one? Currently have Win7 in one container (for some reason, the install code pointed to the French .iso) and Ubuntu 15.04 in another on Hyper-V.
@Herbert,
I am not a Hyper-V expert myself, but here are some thoughts:
-What exactly are the issues you are experiencing? Are they Hyper-V or VirtualBox related? If the latter, did you check the VirtualBox logs?
-Did you start experiencing these issues recently after installing VirtualBox? If so, did you try uninstalling VirtualBox to see if they are gone?
Best,
Gabriel