This article is part of our Academy Course titled VirtualBox Tutorial: Virtualization Essentials.
In this course, we provide a compilation of VirtualBox tutorials that will help you get started with this virtualization platform. We cover a wide range of topics, from installing the software and performing a basic configuration, to cloning, exporting, importing, and removing virtual machines. With our straightforward tutorials, you will be able to get your own Virtual Machines up and running in minimum time. Check it out here!
In previous tutorials you learned how to create virtual machines and perform several operations (clone, import, export, and delete) with them.
We also advised you to become familiar with the logs of your appliances as they are a very useful troubleshooting tool.
Let’s start by copying a few lines from the logs of the Windows 7 virtual machine we used as an example in Cloning, exporting, importing, and removing virtual machines in VirtualBox:
...
00:00:19.696789 VM: Raising runtime error 'HostMemoryLow' (fFlags=0x2)
00:00:19.758101 Changing the VM state from 'RUNNING' to 'SUSPENDING'
...
As the error message suggests, the amount of available RAM was not enough to launch this virtual machine. This is just one example of how the logs will point out the need to update the appliance’s settings in order for it to work as expected. To fix this, in this article we will discuss how to configure (or update the settings of) a virtual machine so that its general, system, network, and storage settings meet the requirements of the guest operating system and the applications running therein.
Configuring a virtual machine
The VirtualBox user interface provides a friendly alternative to the command line utilities that are utilized to configure an appliance. After opening VirtualBox, right click on a virtual machine of your choice and choose Settings… from the popup menu. In the next screen (left hand box) you will see the configuration categories. As explained earlier, we will only focus on the following ones because of their importance:
- General
- Basic: Appliance name / type / version.
- Advanced: Snapshot folder / shared clipboard / Drag and drop feature.
- Description: virtual machine description.
- Encryption: self-explanatory. Requires the use of a password to start the virtual machine.
- System
- Motherboard: RAM / Boot order / Chipset.
- Processor
- Acceleration
- Storage
- Controllers: add / remove disks.
- Network
- Adapters: add / remove / change interfaces.
Let’s begin with the General category.
General
Under General, you will find the mostly-informative categories listed above. The virtual machine type and version are almost always detected by VirtualBox when the appliance is first created, based on its assigned name. If you are planning on distributing the resulting appliance, it is a good idea that you take the time to write a detailed description with as much information about it as possible.
If, in addition, you want to prevent unauthorized people from starting the machine, you can encrypt the appliance by choosing an encryption algorithm and a strong password in the Encryption tab. Depending on that combination, and on the size of the virtual disk(s), this operation (illustrated in Fig. 1) may take considerable time to complete.

After you enter the right password, the boot process will resume as usual. Otherwise, the virtual machine will refuse to start.
System
This category allows you to provision your virtual machine with processing resources. While still limited by the hardware features present on the host, you will be able to change the amount of RAM allocated to the guest through the use of a slider, indicate the desired boot order and chipset (Motherboard tab), the number of CPU cores assigned to the virtual machine in the Processor tab (although possible, it is not recommended to assign more virtual CPUs to the guest than the host has available, as it may end up degrading the performance of the virtual machine).
In the Acceleration tab you can indicate whether VirtualBox should use (and how) the virtualization extensions supported by (and enabled in) the host CPU.
Storage
In a physical (actual) computer, when you need more storage space you buy new disks and install them. If you use Logical Volume Management (LVM), you then create physical volumes, volume groups, and then extend the existing logical volumes.
This, of course, requires that you have physical access to the machine, and know how to install the disks and make sure they are compatible with your motherboard. On the other hand, in a virtual setup -with only a few clicks- you can get all of this done in no more than a couple of minutes.
To add a new virtual disk, click on Controller: SATA and then on the plus sign that is highlighted in Fig. 2, where the beginning of the process is illustrated.
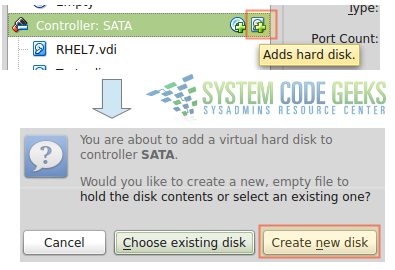
You will notice that the remaining steps (not shown in Fig. 2) do not differ significantly from the instructions given in a previous article to add a first hard disk to the virtual machine when you first created it. The only difference lies in the fact that here you can choose whether to use an existing (virtual) disk (perhaps a drive that was left from another machine), or create a new one.
Network
When you click on the Network category, you will see a list of available adapters for your virtual machine, which can be enabled (this is equivalent to plugging a network interface card (NIC) to an available PCI slot in your motherboard, and making sure it is properly recognized by it) or not.
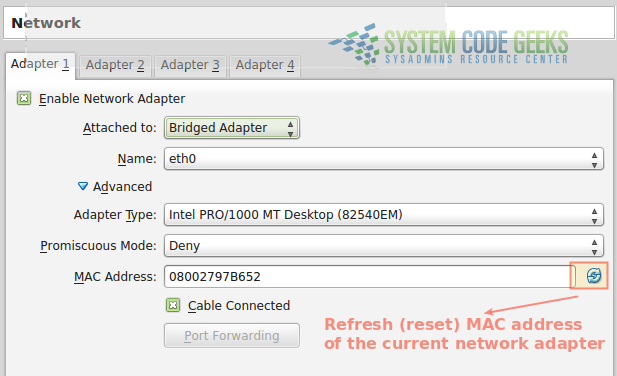
For each adapter, you can choose a type (available in the advanced settings, as indicated in Fig. 3) that will be exposed to the virtual machine, and optionally refresh the MAC address (this is often needed when you have cloned an appliance and did not reset the MAC address previously):
Perhaps the most important field of the network configuration is Attached to: value. The most used settings are:
- NAT (Network Address Translation) is the default networking mode, and is sufficient for the common usage of network services such as browsing the Internet.
- When an interface is configured as Bridged Adapter, VirtualBox connects directly to a physical network card and bypasses the host operating system’s network stack, as opposed to NAT.
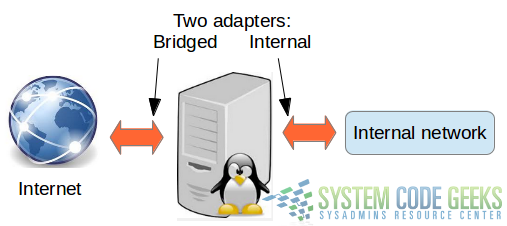
- Internal Network is useful when you need to avoid external applications or even the host itself to access your virtual machine. When combined with a separate Bridged Adapter, an internal network adapter can connect to an internal network while the bridged adapter connects to another (perhaps the Internet). This type of setup (shown in Fig. 4) is typical of a firewall or a HTTP proxy server.
Summary
In this article we have explained what are the most common settings you would like to consider changing while operating one or more virtual machines. Other configuration categories (such as Audio or USB) are better left off with the default values unless they do not work as expected in your setup. If that is the case, it is highly recommended to check the VirtualBox official documentation and / or support forums.
