This article is part of our Academy Course titled VirtualBox Tutorial: Virtualization Essentials.
In this course, we provide a compilation of VirtualBox tutorials that will help you get started with this virtualization platform. We cover a wide range of topics, from installing the software and performing a basic configuration, to cloning, exporting, importing, and removing virtual machines. With our straightforward tutorials, you will be able to get your own Virtual Machines up and running in minimum time. Check it out here!
In our previous article we discussed how to perform several operations with virtual machines including cloning, exporting, importing, and deleting appliances. Among other things, this allows us to back up our virtual machines and to distribute them in a single, bundled file. So far so good.
But what happens if you need to have restore points of your virtual machines you can roll back to in case something goes wrong or does not work as expected while you are making changes (or deploying code, to name another example)? The same principle applies when you want to go back to a given state of the appliance, and that is where snapshots come in handy.
In this tutorial we will explain what snapshots are, how taking a snapshot and restoring it is different than exporting and importing the virtual machine, and give a few suggestions to consider in order to effectively use them in your daily tasks.
Taking a snapshot
The very first difference between exporting a virtual machine and taking a snapshot is the fact that you can perform the latter operation regardless of the current status of the machine. You don’t necessarily have to shut it down in order to take a snapshot.
To begin, open VirtualBox and select the appliance which you want to take a snapshot of. Then click on the Snapshots button as illustrated in Fig. 1. The right pane will then display the list of snapshots that have been taken of that virtual machine (if any).
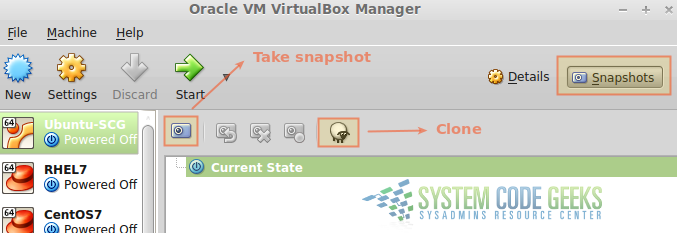
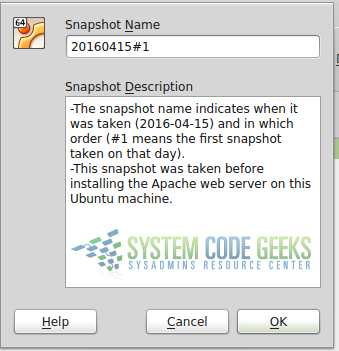
To create an initial snapshot, click on the camera icon shown in Fig. 1. You will then be prompted to choose a name for the snapshot and enter a brief description for it, as shown in Fig. 2. Then click OK.
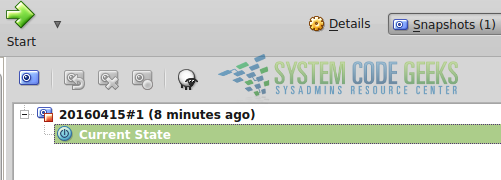
You should now see the snapshot in the list as shown in Fig. 3:
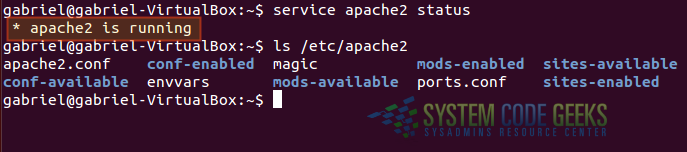
That said, let’s start the machine, make some changes (we will install the Apache web server as explained in “How to install the Apache web server (CentOS / Ubuntu Linux Installation)” using the terminal, which will create the corresponding configuration files as well). When we are done, Apache should be running and its configuration files present as shown in Figure 4.
Now let’s shut the machine down and take another snapshot as explained earlier.
Restoring snapshots
You should now have two snapshots of the appliance as seen on Fig. 5. Note how there are three buttons that are now enabled as compared to Figure 1.
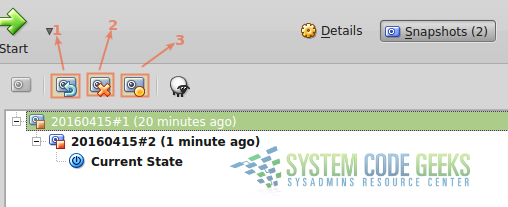
Pay special attention to the highlighted buttons in Fig. 5:
- Restore the selected snapshot.
- Delete the selected snapshot.
- Display a window with information about the selected snapshot.
Once we have made sure the first snapshot is selected, let’s click on the button indicated as #1 above. You will be prompted to confirm the restoration. Choose Restore in the popup window that will appear (see Fig. 6 for more details).

Then let’s start it and check that Apache and its configuration files are not present. The output should be as shown in Fig. 7:

As a personal exercise, you can turn off the appliance and restore the second snapshot. You should then be able to use Apache again. As you create and restore snapshots, pay attention that this process is generally a faster solution than exporting and importing an entire virtual machine.
Things to consider when restoring a snapshot
You have now learned how to create snapshots and how to restore them. It is a good time to point a few important facts you need to consider:
- The hardware settings of the virtual machine are restored as well. If you had assigned more memory, for example, restoring a previous snapshot will undo this change.
- As for modifications made to files, keep in mind that files previously created will be gone, files that had been deleted will be restored, and any changes to existing files will be reverted.
- The snapshots are stored as .vdi (virtual drive) files in a folder named Snapshots under the same directory where the virtual machine files are kept (you can browse directly to this directory by right-clicking on the appliance and choosing Show in File Manager from the popup menu).
You may need to pay special attention to the last item in the list above, as carelessly creating snapshots will result in filling up storage space that may be needed for something else. Make sure to check the snapshots regularly and delete the ones you don’t need anymore.
Summary
In this tutorial we have discussed what virtual machine snapshots are, and explained how to create, restore, and delete them. You are in a better position to operate your appliance now, as you can create restore points to roll it back to a specific state or point in time.
