This article is part of our Academy Course titled PostgreSQL Database Tutorial.
In this course, we provide a compilation of PostgreSQL tutorials that will help you set up and run your own database management system. We cover a wide range of topics, from installation and configuration, to custom commands and datatypes. With our straightforward tutorials, you will be able to get your own projects up and running in minimum time. Check it out here!
After we have learned how to set up and configure PostgreSQL for a variety of scenarios, having a database and populating it with data will not be of any use until we can retrieve it and use it in some way. Today, using a mobile-friendly web application is the most common way to accomplish this goal.
In this tutorial we will explain how to connect to our PostgreSQL database server using PHP, a popular server-side scripting language, how to retrieve data, and how to display it in a web page. Using this foundation, you will be able to go on to create more robust applications that make use of PostgreSQL and PHP.

1. Installing the software
As we just mentioned, we will use PHP to connect to the database server and to display the results of a query in a web page. Before we even start writing the application, we will need to install PHP and some additional packages – including the Apache web server. To do this in an Ubuntu 16.04 server with IP 192.168.0.54, use the following command:
sudo aptitude update && sudo aptitude install apache2 postgresql-contrib php7.0-pgsql
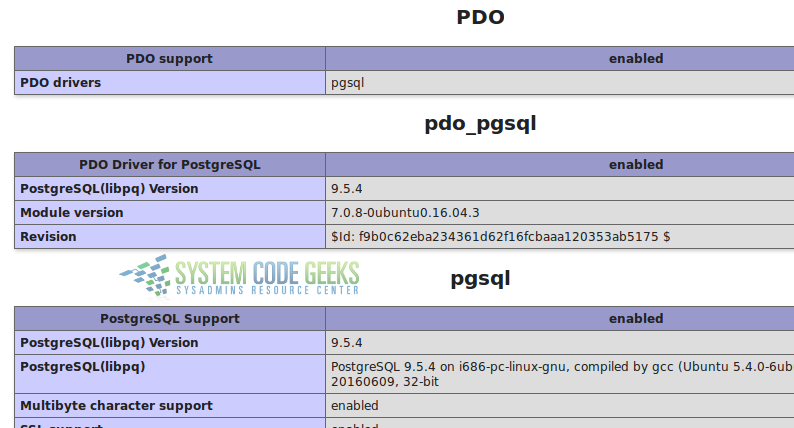
After the installation is complete, create a php file named info.php under /var/www/html with the following three lines. This will help us to verify that PHP has been installed along with the PostgreSQL dependencies:
<?php
phpinfo();
?>
Then browse to 192.168.0.54/info.php and look for the section with the PostgreSQL details. You should find that the PDO driver is enabled and that PHP is supporting our RDBMS, as shown in Fig. 1:
Now we’re ready to start writing our simple, yet functional PHP-based application.
2. Connecting to the database server
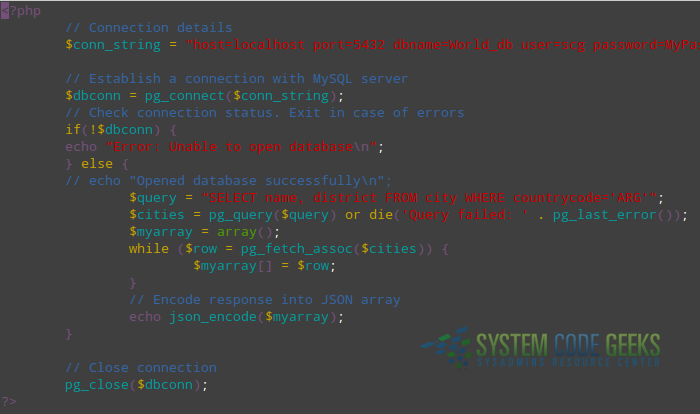
The first thing that we must do is ensure PHP can connect to the database server. Create a file named con.php under /var/www/html with the following contents:
<?php

// Connection details
$conn_string = "host=localhost port=5432 dbname=World_db user=scg password=MyPassword options='--client_encoding=UTF8'";

// Establish a connection with MySQL server
$dbconn = pg_connect($conn_string);

// Check connection status. Exit in case of errors
if(!$dbconn) {
echo "Error: Unable to open database\n";
} else {
echo "Opened database successfully\n";
}

// Close connection
pg_close($dbconn);

?>
For security purposes, set the appropriate ownership to the Linux account postgres (the user the database service runs as) and add the www-data account to the postgres group. This will allow Apache to read this file:
sudo chown postgres:postgres /var/www/html/con.php
sudo chmod 660 /var/www/html/con.php
sudo usermod -a -G postgres www-data
Now go to 192.168.0.54/con.php and make sure the connection to the database is successful before proceeding:

If you get a blank page instead of the confirmation message shown in Fig. 2, inspect the Apache logs to troubleshoot. A missing semicolon or a misplaced quote can cause the connection to fail.
3. Writing the application
To begin, we will comment out the following line in con.php:
echo "Opened database successfully\n";
and insert the following lines below it. Please note that we will use a very simple query that will retrieve city names and the district it belongs to in Argentina (you will later be able to change it to a more complicated query using Common Table Expressions, for example):
$query = "SELECT name, district FROM city WHERE countrycode='ARG'";
$cities = pg_query($query) or die('Query failed: ' . pg_last_error());
$myarray = array();
while ($row = pg_fetch_assoc($cities)) {
$myarray[] = $row;
}

// Encode response into JSON array
echo json_encode($myarray);
The con.php file should now look as seen in Fig. 3:
Save the changes and grant privileges on the city table for the scg user. Note that you’ll have to do this from the PostgreSQL prompt:
GRANT ALL PRIVILEGES ON TABLE city TO scg;
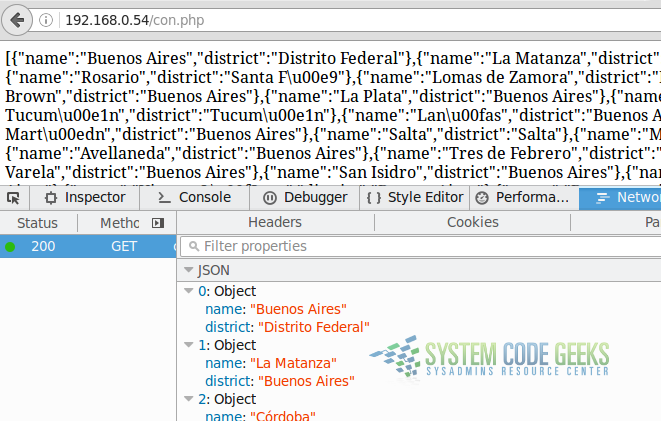
Next, go to 192.168.0.54/con.php. You should see the results of the query in JSON format (see Fig. 4):
Now that we have successfully 1) connected to the database server, and 2) retrieved records into a JSON array, we will explain how to display this information into a mobile-friendly web page.
4. Creating a mobile-friendly web page
Most web developers nowadays use a robust HTML5/CSS/Javascript framework called Bootstrap to write mobile-friendly applications very easily. Though a full discussion about Bootstrap (and the HTML5-related technologies) is out of the scope of this article, it is sufficient to say that one of its distinguishing characteristics is that it divides the viewport in a 12-column grid.
It is up to the developer to decide how many columns will be assigned to a particular piece of content for xs (extra small, i.e. cell phones), sm (small, i.e. tablets and ipads), md (medium, i.e. laptops), and lg or large devices (high resolution monitors). In this tutorial we will assume that we desire to show the city and district fields using 6 columns each in small devices (sm) and up. For extra small screens, city will stack on top of district, as we will see later.
To do this, create a file named index.php in the same location as con.php and insert the following lines into it:
<!DOCTYPE html>
<html>
<head>
<meta charset="utf-8">
<title>Mobile friendly page with PostgreSQL and PHP</title>
<link rel="stylesheet" href="https://maxcdn.bootstrapcdn.com/bootstrap/3.3.7/css/bootstrap.min.css">
</head>
<body>
<div class="container">
<div class="row">
<div class="col-md-6" id="city" style="text-align: center"><strong>City</strong></div>
<div class="col-md-6" id="district" style="text-align: center"><strong>District</strong></div>
</div>
</div>
</body>
<script src="https://code.jquery.com/jquery-3.1.1.min.js"</script>
<script src="https://maxcdn.bootstrapcdn.com/bootstrap/3.3.7/js/bootstrap.min.js"</script>
</html>
<script>
$(document).ready(function(){
$.ajax({
url: 'con.php',
datatype: 'json',
type: 'POST',
success: function(data){
var output = $.parseJSON(data);
for(var i =0;i < output.length;i++)
{
var item = output[i];
$("#city").append("<br>"+item.name);
$("#district").append("<br>"+item.district);
}
}}
);
});
</script>
As you can see, this simple page uses a well-known Javascript library called jQuery to make an Ajax call to con.php and retrieve the results. Again, an adequate discussion about jQuery, Ajax, and Javascript is out of the scope of this article, but you can find some very valuable information on W3schools.
When you browse to 192.168.0.54/index.php, the result should be similar to Fig. 5:
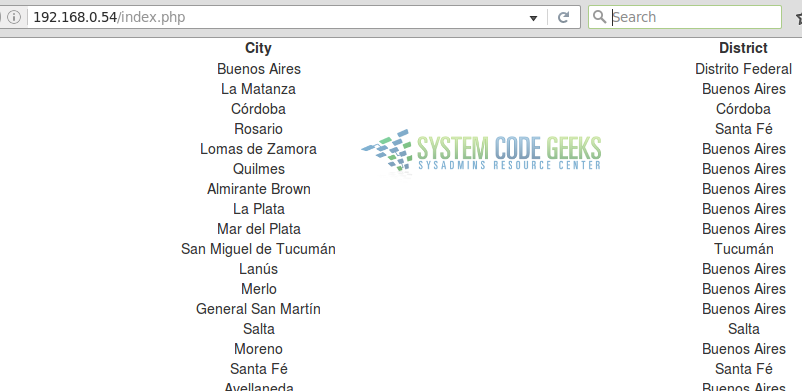
Feel free to resize your browser’s window to see the visualization changes as the viewport changes.
5. Summary
If you followed this tutorial carefully, congratulations! You have set connected to your PostgreSQL server using PHP and displayed data from your database in a mobile-friendly web page. Hopefully this will give you the foundation to create more sophisticated applications.
