This article is part of our Academy Course titled PostgreSQL Database Tutorial.
In this course, we provide a compilation of PostgreSQL tutorials that will help you set up and run your own database management system. We cover a wide range of topics, from installation and configuration, to custom commands and datatypes. With our straightforward tutorials, you will be able to get your own projects up and running in minimum time. Check it out here!
Since hardware can fail and human error may occur, having frequent backups and knowing how to restore them are important skills that every system administrator should have. Additionally, you will need to know how to migrate PostgreSQL databases from one machine to another in case you purchase new, more powerful servers. Thus, in this tutorial we will discuss how to perform these critical operations using a test environment with two Ubuntu 16.04 (server edition) virtual machines. We will name these VMs newserver (192.168.0.54) and oldserver (192.168.0.55), where the same PostgreSQL version (9.5) has been installed on both. We assume we will migrate the World_db database on oldserver over to newserver.

1. Backup, restore, and migration strategies
Traditionally, PostgreSQL database administrators used shell scripts and cron jobs to back up their databases. Although this approach was considered efficient a decade (or so) ago, today there are tools that make this process hassle-free and easier to maintain. Among these tools, Barman (Backup and Recovery Manager), a Python-based open source solution developed and maintained by 2ndQuadrant (a firm that specializes in PostgreSQL services) stands out.
2. Installing Barman
More accurately, Barman is a backup, restore, and disaster recovery tool for PostgreSQL. We will install it on the virtual machine that we called newserver (192.168.0.54) to migrate the databases from oldserver (192.168.0.55).
That said, let’s install Barman:
sudo aptitude update && sudo aptitude install barman
Once the installation has completed successfully, proceed with the following steps.
Step 1 – Create a dedicated PostgreSQL user in oldserver
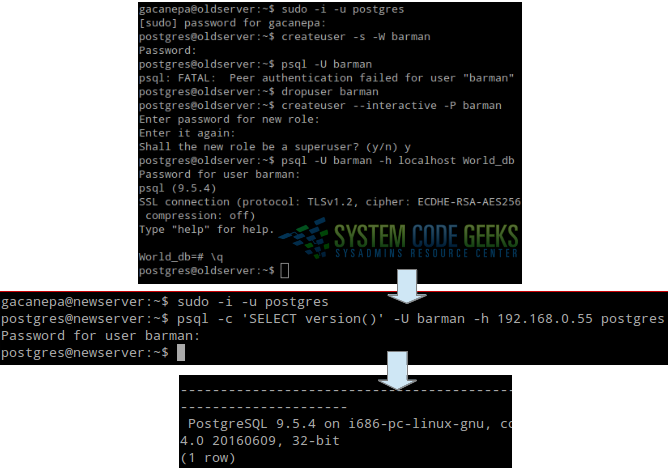
In order for barman (which has been installed in newserver) to communicate with the PostgreSQL instance running on oldserver, we need to create a dedicated database user. To do so, run the following command as postgres on oldserver and enter the desired password for the new database user. Also, when you’re prompted to confirm if the account should have superuser privileges, enter y and press Enter
createuser --interactive -P barman
Then test the connection from newserver. We will check the connection against the postgres database, but you can use other database (in that case, you’ll have to modify the SQL query inside single quotes):
psql -c 'SELECT version()' -U barman -h 192.168.0.55 postgres
Refer to Fig. 1 for details:
Step 2 – Create the .pgpass file in newserver
As part of the installation of Barman on newserver, a Linux account called barman was created. To set its password, do
sudo passwd barman
and enter the desired password. Then, switch user to barman:
sudo -i -u barman
and create the .pgpass file for user barman:
echo "192.168.0.55:5432:*:barman:password" >> ~/.pgpass
This file can contain passwords to be used if a connection requires one (in this case, barman will use it to talk to the PostgreSQL instance on oldserver).
Step 3 – Set up key-based authentication
In order to perform backups without user intervention we will need to set up and copy SSH keys for passwordless authentication. Barman will make use of this method to copy data through rsync.
On newserver, switch to user barman and generate the keys
ssh-keygen -t rsa
(choose the default destination file for the public key and an empty passphrase).
Next, copy the public key to the authorized keys of user postgres on oldserver:
ssh-copy-id postgres@192.168.0.55
This will allow barman on newserver to connect to oldserver as user postgres. To test if the connection can be made without password, as expected, you can run the following command (on success, it will not return anything):
ssh postgres@192.168.0.55 -C true
You’ll also need to allow barman to SSH into localhost as the local user postgres:
ssh-copy-id postgres@localhost
ssh postgres@localhost -C true
Finally, on oldserver log in as postgres and do
ssh-keygen -t rsa
and copy the resulting key to the list of authorized keys for user barman on newserver:
ssh-copy-id barman@192.168.0.54
Again, test the connection before proceeding:
ssh barman@192.168.0.54 -C true
Step 4 – Configure Barman
On newserver, open the Barman main configuration file (/etc/barman.conf) and uncomment this line by removing the leading semicolon:
;configuration_files_directory = /etc/barman.d
should read
configuration_files_directory = /etc/barman.d
(if /etc/barman.d does not exist, you’ll have to create it with mkdir /etc/barman.d)
And create a file named oldserver.conf with the following contents (the word inside square brackets represents the name that barman will use to identify the connection details):
[oldserver]
description =  "Our old PostgreSQL server"
conninfo = host=192.168.0.55 user=barman dbname=World_db
ssh_command = ssh postgres@192.168.0.55
retention_policy = RECOVERY WINDOW OF 2 WEEKS
where most variables are self-explanatory with the exception of retention_policy. This variable is used to determine for how long backups should be kept (2 weeks in this case). This should be modified based on the expected activity and growth of the database, and the available space on the filesystem where backups will be kept.
Step 5 – Configure PostgreSQL
On oldserver:
Add this line to /etc/postgresql/9.5/main/pg_hba.conf:
host all all 192.168.0.54/24 trust
Then make sure the following variables on /etc/postgresql/9.5/main/postgresql.conf have the indicated values:
wal_level = archive
archive_mode = on
archive_command = 'rsync -a %p barman@192.168.0.54:/var/lib/barman/oldserver/incoming/%f'
On newserver, make sure the following variable on /etc/postgresql/9.5/main/postgresql.conf has the indicated value:
data_directory = '/var/lib/postgresql/9.5/data'
If the directory called data does not exist under /var/lib/postgresql/9.5, create it before proceeding (that is where the data files will be stored on newserver)
Then restart the postgresql service to activate the latest changes:
sudo systemctl restart postgresql
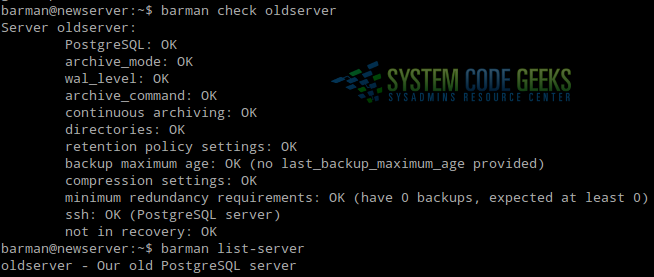
Step 6 – Test the Barman configuration
Once PostgreSQL has been configured on oldserver to allow connections from newserver, we are ready to test the configuration. To do so, switch to user barman on newserver and do
barman check oldserver
barman list-server
The first command will check the SSH and PostgreSQL connections, whereas the second one will show the list of configured PostgreSQL servers we wish to back up.
The output should be as follows (see Fig. 2):
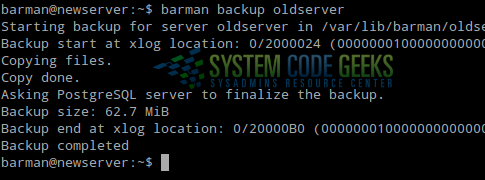
Step 7 – Perform the backup
Once all of the items in the output of barman check oldserver return OK, we are ready to perform our first backup with the following command (see Fig. 3):
barman backup oldserver
The output should be similar to Fig. 3:
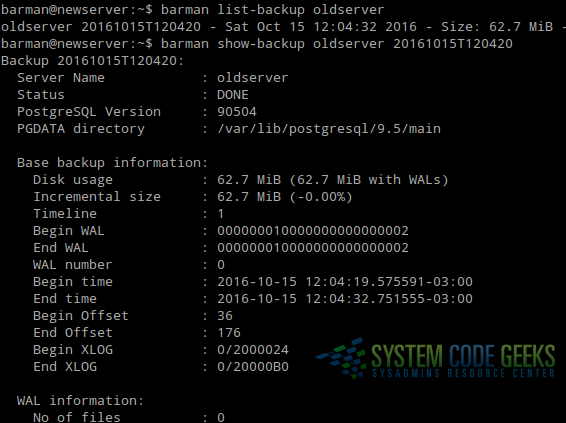
Once the backup has completed we can identify it with the help of
barman list-backup oldserver
which will list all the backups we have performed for oldserver. To view details about a specific backup, we’ll use
barman show-backup oldserver backup_id
where backup_id is the backup identification (20161015T120420 in Fig. 4).
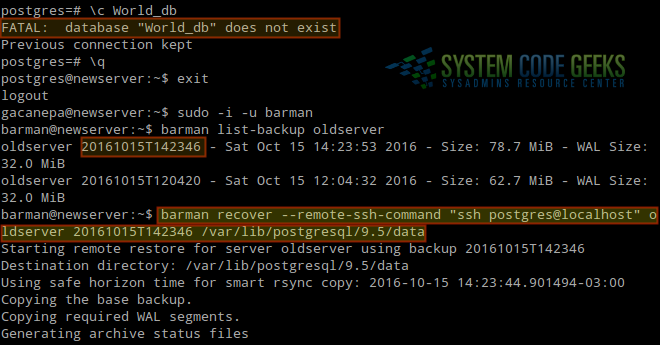
Step 8 – Restore the backup on newserver
As we can see in Fig. 8, the World_db database can’t be found on newserver. To migrate a backup, we will stop the postgresql service
sudo systemctl stop postgresql
and run the following command as user barman:
barman recover --remote-ssh-command "ssh postgres@localhost" oldserver 20161015T142346 /var/lib/postgresql/9.5/data
Note how barman makes use of the SSH keys to connect as user postgres to localhost in order to load the backup with id 20161015T142346 to the data directory. The result is shown in Fig. 5:
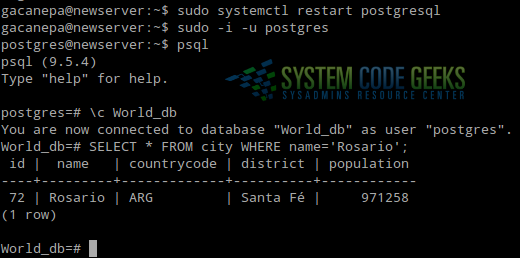
After the recovery or migration is complete, start the postgresql service with a user with sudo access
sudo systemctl start postgresql
and check the World_db database as user postgres:
sudo -i -u postgres
psql
\c World_db
Now let’s run queries against the database, as shown in Fig. 6:
Congratulations! You have successfully set up a very effective method to back up, restore, and migrate PostgreSQL databases.
3. Automating backups
In order to automate the backup process, switch to user barman and open the crontab file:
sudo -i -u barman
crontab -e
Then add the following two lines in it in order to execute a backup of oldserver each day at 12:45 pm
45 12 * * * /usr/bin/barman backup oldserver
Please note that this is a basic Barman / PostgreSQL setup, so I strongly suggest to check the official Barman docs here.

Thank you for your tutorial. I have followed the steps and crosscheck with other tutorials but I am stuck testing the barman. barman@barman-backup-server:~$ barman list-server main-db-server – Our main PostgreSQL server (WARNING: disabled) standby-db-server – Standby DB Server barman@barman-backup-server:~$ barman list-server main-db-server – Our main PostgreSQL server (WARNING: disabled) standby-db-server – Standby DB Server barman@barman-backup-server:~$ barman check standby-db-server Server standby-db-server: WAL archive: FAILED (please make sure WAL shipping is setup) PostgreSQL: FAILED directories: OK retention policy settings: OK backup maximum age: FAILED (interval provided: 1 day, latest backup age: No available backups) compression settings: OK failed backups: OK (there are… Read more »
After setting up barman i’m getting stuck at “Asking PostgreSQL server to finalise backup” . I’ve rechecked the wals incoming directory. Does the finalising takes some time or did something go wrong ? Any help will be much appreciated .